How to make Harry Potter wands
These DIY Harry Potter Wands look like they are straight out of the wizarding world! Made with wooden dowels and a drill!
Servings 1 wand
Cost $15
Equipment
- Drill
- Protective gear- Leather glove is a MUST as well as goggles. A mask might not be a bad idea either.
Ingredients
- 1- 1/2 inch dowel or larger depending on the bit size of your drill
- Carving Tools or pocket knife
- Sand Paper– 100 80, and 60 grit
- Paint or stain
- Gloss finishing spray
Instructions
- 1. Start by cutting your dowels OR you can buy a pack that is pre cut for you. We had a longer dowel that we cut into 3 pieces between 10″ to 12″ long.
- 2. Use a knife or carving kit to start a design. We kept this mainly to the handles. You need the design to be fairly deep and also need to leave roughly 1 inch of space at the very end of the dowel (it will get divots from the drill).
- 3. Once you have a basic design, place the dowel into the drill in place of the bit, handle side in. Tighten the drill to hold the dowel in place.
- 4. Wearing a leather glove (I know, not pictured but I learned this the hard way), start sanding the dowel while you turn on the drill. This creates a sort of DIY lathe.
- 5. Continue to sand, using the different grits, to form the tip of the wand and gently clean up the carved handle.
- 6. Once the tip of the wand has reached a shape you are pleased with, remove it from the drill. Use the sand paper to soften the end. It will have divots from the drill that will need to be smoothed out.
- 7. Clean the dowels well to remove all of the dust.
- 8. Stain or paint each wand. Finish with a good spray of sealer and let them dry completely.
Video
Notes
- Be patient! This is not easy with the first wand. My dad tried and gave up pretty quickly. It takes a little practice. Once I figured it out I could whip up a wand in about 15 minutes.
- Get creative. You really can’t mess these up. If you accidentally take too much out… consider it added character! I feel like the Wizarding World really is full of fun wonky style anyway.
- Chop Stick Harry Potter Wands are definitely easier to make. However, these wands are party favors that will be kept for years. It’s been almost 6 years since we held this party and the kids STILL play with them together. In fact, my sisters kids (in their 20’s) begged me to make some for their birthday back in January.
How to add detail to DIY Wizard Wands:
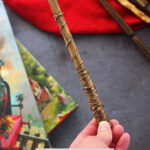
Carving is the biggest way to add a little character to each wand making it unique, but here are a few other great ideas we used:- Hot Glue: One request was a Hermione style wand. I stained a basic wand brown. Once it dried I used hot glue to give it that 3d twist around the base. Once it hardened I brushed on brown paint just on the glue with a touch of gold.
- FIRE: Ok, this one was all my husband. He used a torch to give some burned look on some of the wands that was well received by the new owners.
- Name the wands! This is where it gets really fun. Add a small tag with the wands information. Example: Silver lime wood with a dragon heartstring core, 11 ½” and slightly yielding flexibility.