Garlic Butter Chicken
This post may contain affiliate links.
Garlic Butter Chicken is one of those rare unicorn recipes: fast, flavorful, and picky-eater approved. Whether you need a last-minute dinner idea or something that actually uses what’s in your fridge, this one checks all the boxes. Stick around—you’re gonna want this in your weekly rotation.
Make it a meal and serve along side broccoli salad, roasted broccoli, or crispy potatoes!
Why You’ll Love This Recipe
- Easy weeknight dinner: Quick to prep, quick to cook, and minimal cleanup—perfect for busy evenings.
- Family-friendly chicken recipe: Even picky eaters will go back for seconds (maybe even thirds).
- Pantry staple meal: Uses simple, everyday ingredients you probably already have on hand.
- 30-minute dinner idea: From prep to plate in around half an hour—yes, really.
This butter and garlic chicken is what weeknight dinner dreams are made of—crispy, golden chicken tossed in a rich, buttery garlic-lemon sauce that tastes like it came from a fancy restaurant (but took you less than 30 minutes). It’s made with simple pantry staples, comes together in one pan, and delivers big flavor without the fuss.
Whether you’re feeding picky eaters, cooking for two, or just need a no-fail go-to, this recipe checks all the boxes. Serve it over pasta, rice, or with a side of roasted veggies—it’s versatile, reliable, and 100% worth bookmarking.
Ingredients You’ll Need
Simple ingredients, big flavor—this one’s a weeknight win waiting to happen. Before you dive in, here’s a quick peek at what you’ll need (and a few tips to make things even easier).
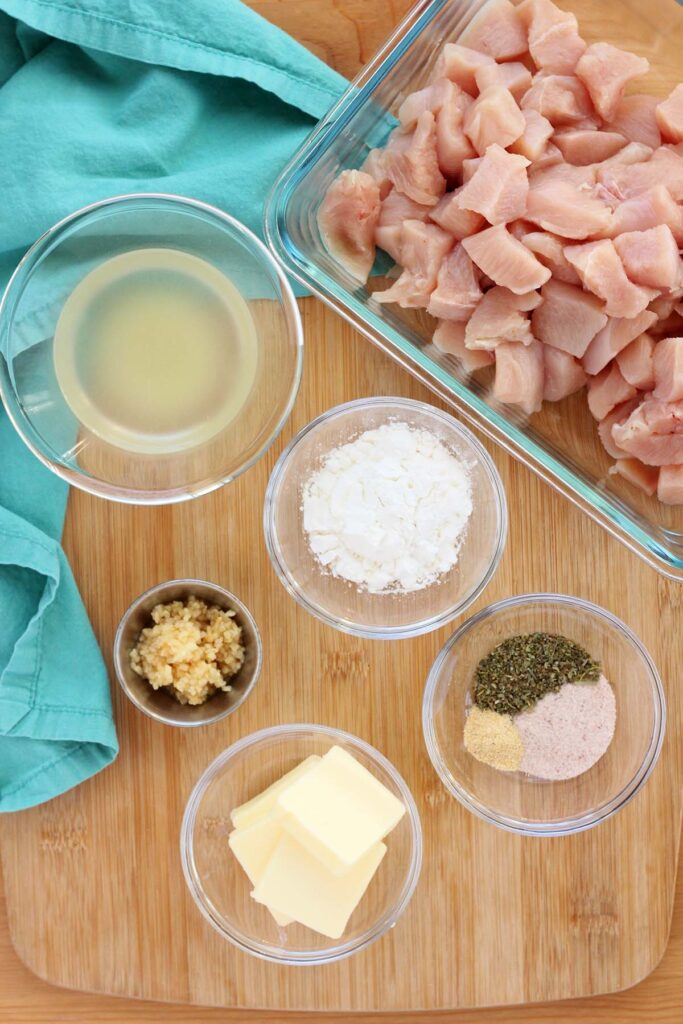
- Cornstarch – The secret to that golden crust and a silky sauce. Don’t skip it.
- Seasonings– Specifically, salt, Italian seasoning, and garlic powder. It’s the trifecta of flavors.
- Chicken Breast – Boneless, skinless is the way to go. Slice them thin or pound for even cooking.
- Oil – Use a neutral oil (like avocado or canola) for searing the chicken golden brown.
- Garlic – Fresh garlic adds that rich, savory base. Don’t burn it—sauté just until fragrant.
- Chicken Broth – Opt for low-sodium so you can control the salt. Adds depth to the sauce.
- Butter – For that velvety finish. Adds richness and balances the lemon.
- Lemon Juice – Fresh is best! It brightens the whole dish and ties everything together.
That’s it! Nothing fancy, just pantry staples working together to create something downright delicious.

Jesseca’s Recipe Review
This recipe is a weeknight hero. The chicken turns out crispy on the outside, tender inside, and that buttery garlic-lemon sauce? Chef’s kiss. My picky teenager asked for seconds—which basically means it’s a five-star dish in our house.
Tip from Jesseca:
For extra juicy chicken, let it rest for a few minutes after cooking before tossing it in the sauce. This helps lock in the moisture and keeps the coating crisp!
Substitutions and Variations
Missing an ingredient or want to mix things up? No problem—this butter and garlic chicken breast is super flexible. Here are a few easy swaps and tasty twists to try:
- Chicken Breast → Swap with boneless thighs for a juicier bite. You can even use tenders—just adjust cook time.
- Cornstarch → Out of cornstarch? Use flour instead. It won’t be quite as silky, but it still gets the job done.
- Italian Seasoning → No blend on hand? Use a mix of dried basil, oregano, thyme, or whatever herbs you’ve got.
- Lemon Juice → Try white wine vinegar or even a splash of white wine for a different kind of tang.
- Butter → Want to lighten it up? Use less butter.
- Add-ins → Toss in spinach, cherry tomatoes, or mushrooms after searing the chicken for an easy one-pan veggie upgrade.
This one’s a keeper because it works with what you’ve got—just tweak it to fit your fridge and your mood.
Butter and Garlic Chicken Recipe
This garlic butter chicken comes together in a snap and tastes like you low-key belong on a cooking show. Here’s a quick peek at how it all goes down:
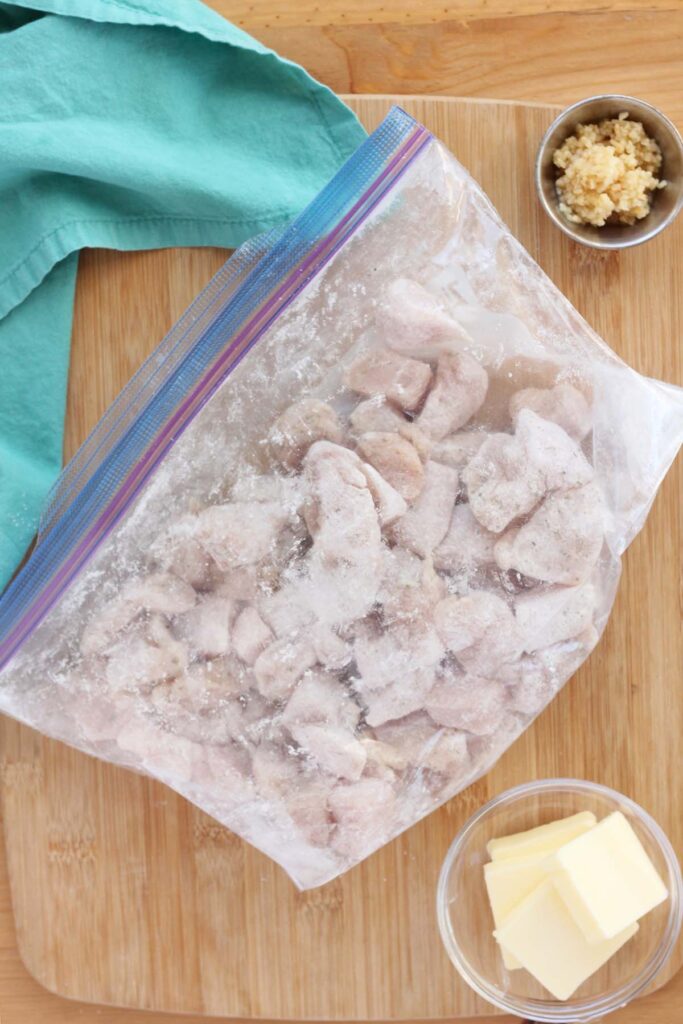
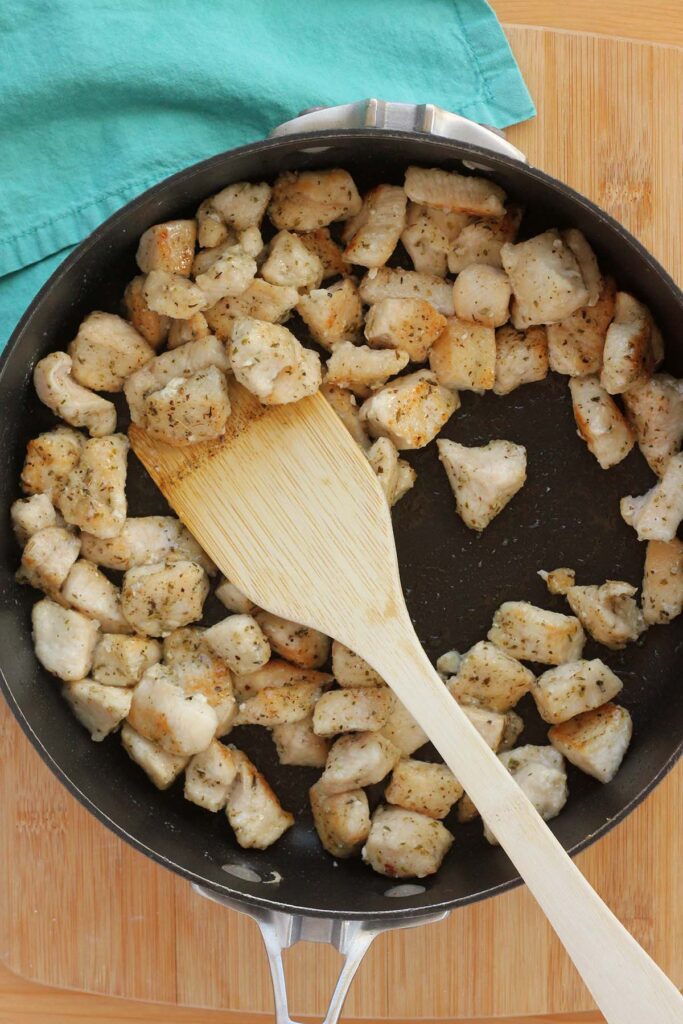
- Coat the chicken – Toss chicken pieces in a mix of cornstarch, salt, Italian seasoning, and granulated garlic. Zip-top bag or bowl—whatever’s easier.
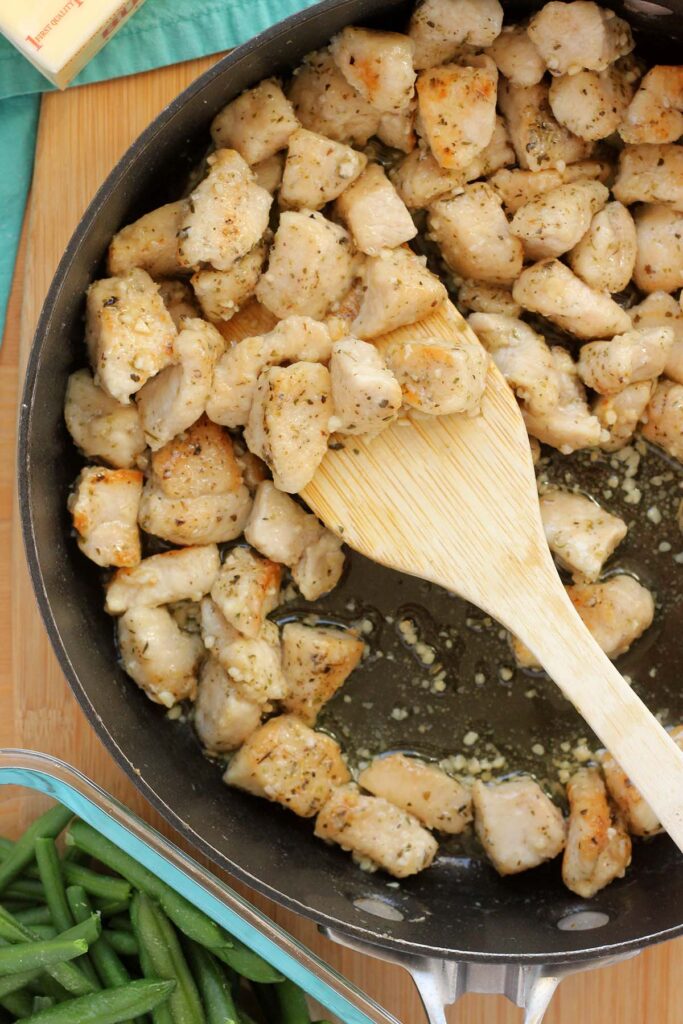
- Sear it up – Cook the coated chicken in a hot skillet until it’s golden and crispy on both sides. Set it aside once cooked through.
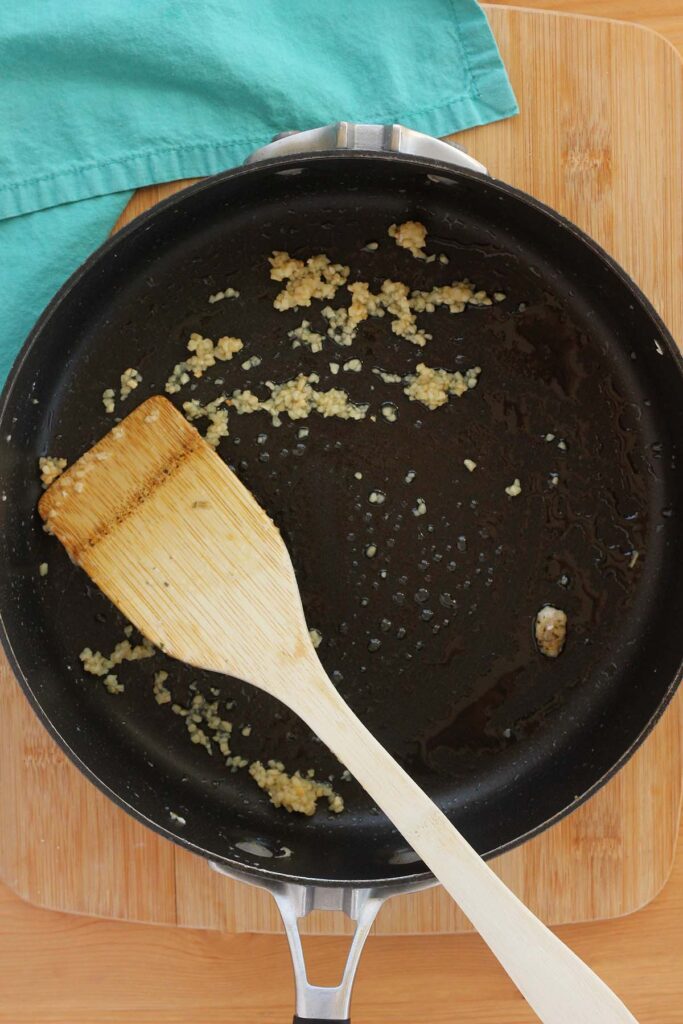
- Sauté garlic – Lower the heat and give fresh garlic a quick sizzle until fragrant.
- Add wine – Pour in a splash of white wine and cook it down. This builds flavor fast.
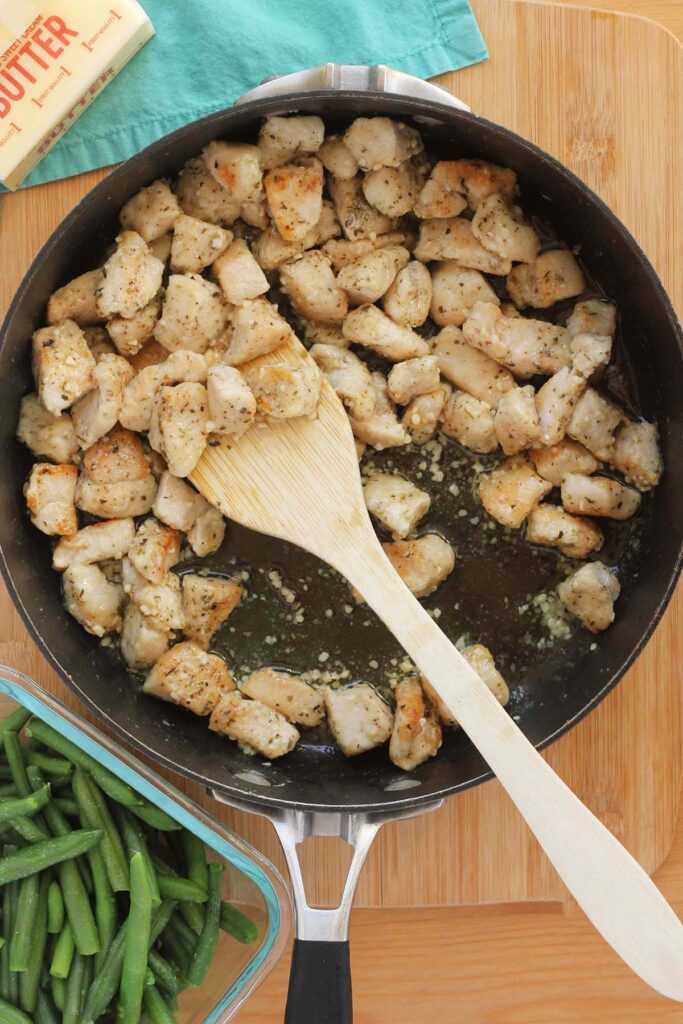
- Finish with butter & lemon – Stir in butter and lemon juice until melted and silky.
- Toss it all together – Add the chicken back in and coat it in that dreamy garlic butter sauce.
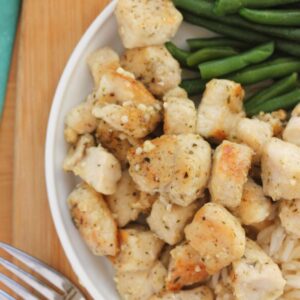
Dinner = done. Serve it over rice, pasta, or with some roasted veggies and call it a win. Want a set it forget it version? Try this Crockpot garlic chicken!

Storage and Make-Ahead Instructions
Make-Ahead: You can prep the seasoned cornstarch coating ahead of time and even coat the chicken up to a day in advance—just store it covered in the fridge until you’re ready to cook. The sauce also comes together quickly, so you could mince the garlic and measure everything out ahead of time to save a few minutes.
Storage: Leftovers? Lucky you. Store any cooled chicken in an airtight container in the fridge for up to 3 days. Reheat gently in a skillet over medium heat with a splash of broth or water to keep the sauce from drying out.
Freezer Friendly? Not really. The cornstarch coating doesn’t hold up well after freezing and reheating, so this one’s best enjoyed fresh or from the fridge.
Recipe FAQs
Yes! Boneless, skinless thighs work great and tend to stay extra juicy. Just adjust the cook time slightly since they may take a minute or two longer.
Not at all! But if you like a little heat, toss in a pinch of red pepper flakes when you add the garlic to this butter garlic chicken breast.
This chicken goes with everything. Serve it over pasta, rice, mashed potatoes, or alongside roasted veggies or a big salad.
Yes—just be sure to cook the chicken in batches so it browns instead of steams. Crowding the pan will keep it from getting that golden crust.
Use a meat thermometer if you’ve got one. The internal temp should hit 165°F. If not, slice into a thicker piece—it should be white and juicy, not pink.

Still Hungry? Follow One Sweet Appetite on Instagram, Pinterest, and Facebook!
Want to save this recipe?
Enter your email below & we’ll send it to your inbox. Plus get great new recipes from us every week!
Garlic Butter Chicken
Ingredients
- 2 tablespoons cornstarch
- 1 teaspoon kosher salt
- 1 teaspoon italian seasoning
- 1/8 teaspoon garlic powder
- 1 pound boneless skinless chicken breast (cut into 1 to 1 1/2 inch pieces)
- 2 tablespoons olive oil
- 3 cloves garlic
- 1/4 cup chicken broth
- 4 tablespoons unsalted butter (cubed)
- 1 teaspoon fresh lemon juice
Instructions
- In a medium bowl or large zip-top bag, combine the cornstarch, salt, Italian seasoning, and granulated garlic. Mix until everything is evenly blended. Add the chicken pieces and toss until each piece is fully coated.
- Heat oil in a large non-stick skillet over medium-high heat until it just starts to shimmer. Add the coated chicken pieces in a single layer, making sure not to overcrowd the pan. Cook without moving them for about 4 minutes, or until the bottoms are golden brown.
- Flip the chicken and continue cooking for another 4 minutes, or until fully cooked through and nicely browned on both sides. Transfer the chicken to a clean plate and set aside. Wipe the skillet clean.
- Reduce the heat to medium. Add the minced garlic and sauté, stirring constantly, for 1–2 minutes, just until the garlic is fragrant and beginning to brown slightly.
- Pour in the white wine and cook, stirring often, for about 2 minutes or until most of the liquid has evaporated.
- Add the butter and lemon juice to the skillet. Stir until the butter is melted and the sauce is smooth.
- Return the cooked chicken to the skillet. Toss well to coat each piece in the buttery garlic sauce. Remove from heat and serve immediately.
Notes
Air Fryer Method
Want to keep things a little lighter? The air fryer’s got your back. Preheat your air fryer to 400°F (200°C). Lightly spray the basket with cooking spray, then arrange the coated chicken pieces in a single layer—no overlapping. Give the tops a quick spray, too. Cook for about 10-14 minutes, flipping halfway through, until the chicken is golden and cooked through. While the chicken’s crisping up, make the sauce in a skillet on the stove. Just sauté the garlic, add the wine, let it reduce, then stir in the butter and lemon juice until melted and smooth. Toss the air-fried chicken in the warm sauce just before serving. Crispy, saucy, and still easy. Win-win.Nutrition
The nutrition facts provided are calculated using a third-party tool and are estimates only. Actual nutritional content may vary based on the ingredients and brands you use, as well as portion sizes. For accurate results, please consult a registered dietitian or nutritionist.
This recipe was adapted from Allrecipes