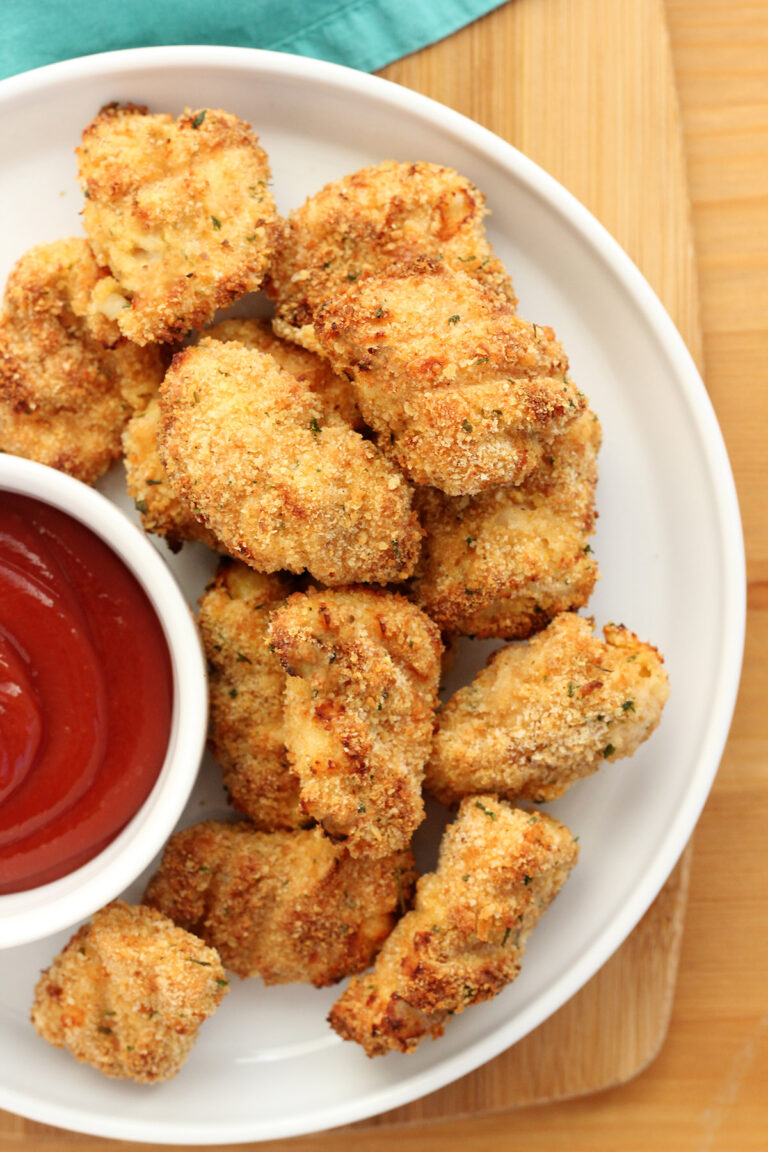
Oven Fried Chicken
This post may contain affiliate links.
If you’re craving crispy oven fried chicken without the mess of deep frying, this one delivers. You get that golden, crunchy coating and juicy, flavor-packed chicken using simple pantry ingredients and a quick bake in the oven. It’s simple, reliable, and when my picky teenager went back for thirds and called it a favorite, I knew it was worth sharing.
What Makes This Oven Fried Chicken A Win
- Crispy without deep frying. You get that golden, crunchy coating without standing over hot oil.
- Easy weeknight dinner. Quick prep and hands-off baking make this perfect for busy nights.
- Less mess, easier cleanup. One pan, no splatter, and way fewer dishes to deal with.
- Family-friendly and picky eater approved. Mild seasoning and crispy texture make it a win for all ages.
Have you ever made a dinner your kids actually eat without complaints and felt like you deserved a trophy? These oven fried chicken thighs are that recipe for me. I tested a few seasoning combos to get the flavor just right, and the first time this version hit the table my teenager went back for thirds. That was my sign it was ready to share.
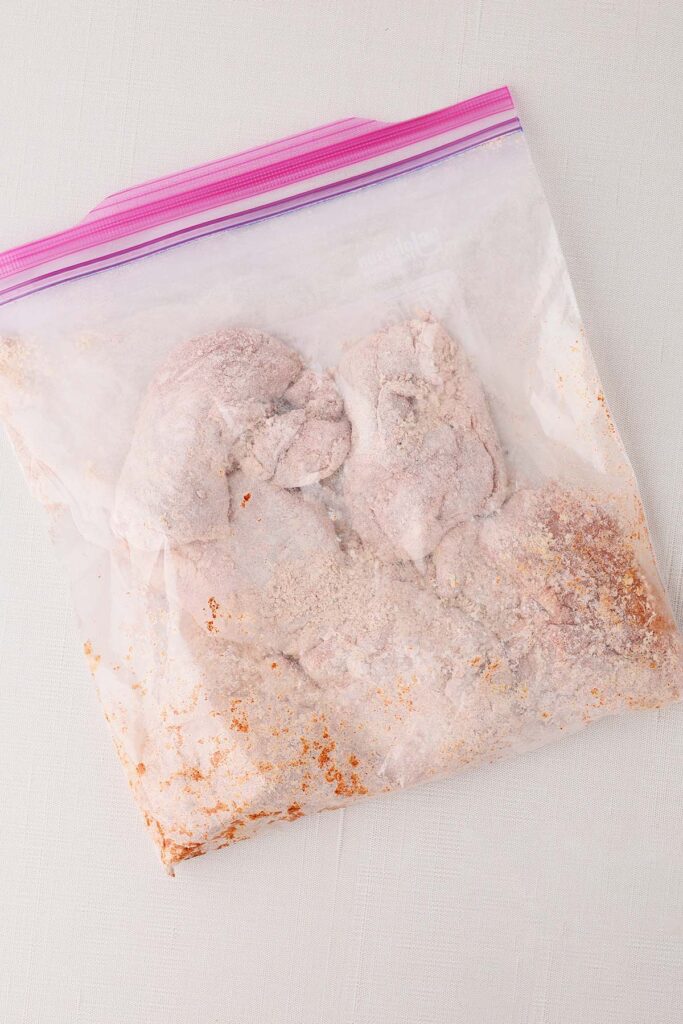
This recipe comes together fast with a quick shake-and-bake style of flour, panko, and spices, then straight into a pan of melted butter. The oven does the rest, giving you that golden, crispy coating with juicy chicken underneath. All you really have to do is flip halfway through, which makes this an easy go-to when you need something warm, familiar, and guaranteed to get eaten.
Shake and Bake Chicken Ingredients
This is one of those recipes where simple ingredients do the heavy lifting. Each one plays a role in building that crispy coating and rich, savory flavor without overcomplicating things.
- Chicken thighs: Boneless, skinless thighs stay juicy and tender, even at a higher oven temp. Trim off any large pieces of fat for the best texture.
- Flour: Helps the coating stick and gives you that classic fried chicken base.
- Panko breadcrumbs: Adds the light, crispy crunch that sets this apart from a basic baked chicken.
- Seasonings: A mix of salt, paprika, garlic, onion, and pepper brings in that savory, slightly smoky flavor.
- Butter: Melted in the pan, this is the secret to that golden, almost fried-style finish.
A few quick tips before you start. Don’t skip preheating the butter since that’s what helps the coating crisp up right away. Shake the chicken well in the bag so everything is evenly coated. And make sure the chicken is in a single layer in the pan so it bakes instead of steams.

Jesseca’s Recipe Review
I didn’t expect this one to hit as hard as it did. It’s one of those recipes that feels almost too simple, but then you pull it out of the oven and it looks and smells like real deal fried chicken. The outside gets perfectly crisp and the inside stays super juicy. Definitely a recipe I’ll be pulling out for family parties.
Tip from Jesseca:
Make sure the butter is fully melted and hot before adding the chicken. That sizzle when it hits the pan is what helps create that golden, crispy coating right from the start.
Easy Variations
This is a super flexible recipe, which makes it easy to adjust based on what you have or what your family prefers.
- Switch the cut of chicken. Try boneless chicken breasts or tenders. Just keep an eye on cook time since they can dry out faster.
- Make it extra crisp. Swap part of the flour for more panko or add a little crushed cornflakes for added crunch.
- Add a little heat. Mix in a pinch of cayenne or chili powder to the seasoning blend for a subtle kick.
- Air fryer option. Skip the butter and spray lightly with oil, then cook in the air fryer until golden and cooked through.


What Chicken Works Best
Chicken thighs are the clear winner here. They stay juicy, have more flavor, and are much more forgiving in the oven compared to other cuts. If you’ve ever ended up with dry baked chicken, this is the fix.
- Boneless, skinless chicken thighs (best choice). Easy to prep, cooks quickly, and stays tender with that crispy coating.
- Bone-in chicken thighs. Great flavor, but you’ll need to increase the cook time and make sure they reach temperature.
- Chicken breasts. Works in a pinch, but slice them in half lengthwise so they cook evenly and don’t dry out.
- Chicken tenders. Perfect for kids and cook faster, just reduce the bake time and keep an eye on them.
- Even sizing matters. Try to use pieces that are similar in size so everything cooks at the same rate.
If you’re deciding what to use, thighs are the safest bet for getting that juicy inside with a crispy, golden outside.


Oven Fried Chicken Thighs- Your Questions Answered
Yes, but slice them in half lengthwise so they cook evenly. Breasts cook faster and can dry out, so start checking them earlier.
Most of the time it comes down to one thing: the butter wasn’t hot enough when the chicken went in, or the pan was overcrowded. You need that initial sizzle and space between pieces to get a crisp coating.
You can use oil, but butter gives the best flavor and helps create that classic “fried chicken” taste. If you swap, use a neutral oil and make sure it’s hot before adding the chicken.
They’re best around 175 to 185°F. That’s when they’re tender and juicy, not chewy.
Storage and Reheating Instructions
If you have leftovers, this chicken holds up surprisingly well and is easy to bring back to life.
- Refrigerate:
Let the chicken cool completely, then store in an airtight container in the fridge for up to 3–4 days. - Reheat in the oven (best option):
Place chicken on a baking sheet and warm at 375°F for 10–15 minutes, or until heated through. This helps bring back the crispy edges. - Reheat in the air fryer:
Heat at 350°F for 5–8 minutes. This is the fastest way to get the coating crisp again. - Microwave (last resort):
It works, but the coating will soften. If you go this route, heat in short bursts to avoid overcooking.
For the best texture, skip covering the chicken while reheating. Airflow is what helps that coating stay crisp instead of turning soggy.

Want to save this recipe?
Enter your email below & we’ll send it to your inbox. Plus get great new recipes from us every week!

Oven Fried Chicken Recipe
Ingredients
- 1½ lb chicken thighs (trimmed)
- 1/4 cup all-purpose flour
- 1/4 cup panko breadcrumbs
- 1 ½ teaspoons salt
- 1 ½ teaspoons paprika
- 1/2 teaspoon onion powder
- 1/2 teaspoon garlic powder
- 1/4 teaspoon black pepper
- 1/2 cup butter
Instructions
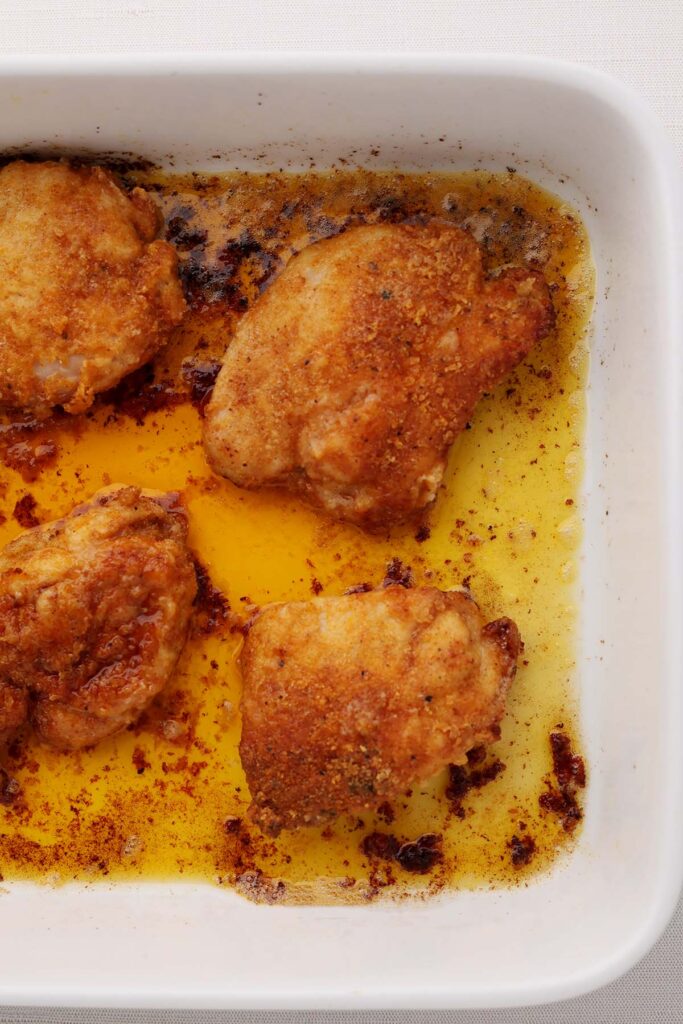
- Preheat oven to 425°F. Place the butter in a 9×13 baking dish and put it in the oven for about 5 minutes, or until fully melted and hot.
- While the butter melts, add the flour, panko, and all seasonings to a large zip-top bag. Shake to combine.
- Add the chicken to the bag, seal, and shake until each piece is evenly coated.
- Carefully remove the hot pan from the oven. Place the coated chicken in a single layer in the melted butter.
- Bake for 15 minutes.
- Flip the chicken and continue baking for 15–20 minutes more, or until the internal temperature reaches 175–185°F and the coating is golden and crisp.
- Remove from the butter to a wire rack and let rest for 3–5 minutes, then serve warm.
Notes
- Make sure the butter is hot before adding the chicken for the best crispy texture.
- Don’t overcrowd the pan. Give each piece space to crisp.
- Chicken thighs are best cooked to at least 175°F for maximum tenderness.
- For extra crunch, you can lightly press the coating onto the chicken before baking.
Nutrition
The nutrition facts provided are calculated using a third-party tool and are estimates only. Actual nutritional content may vary based on the ingredients and brands you use, as well as portion sizes. For accurate results, please consult a registered dietitian or nutritionist.