
Maple Bacon Donuts
This post may contain affiliate links.
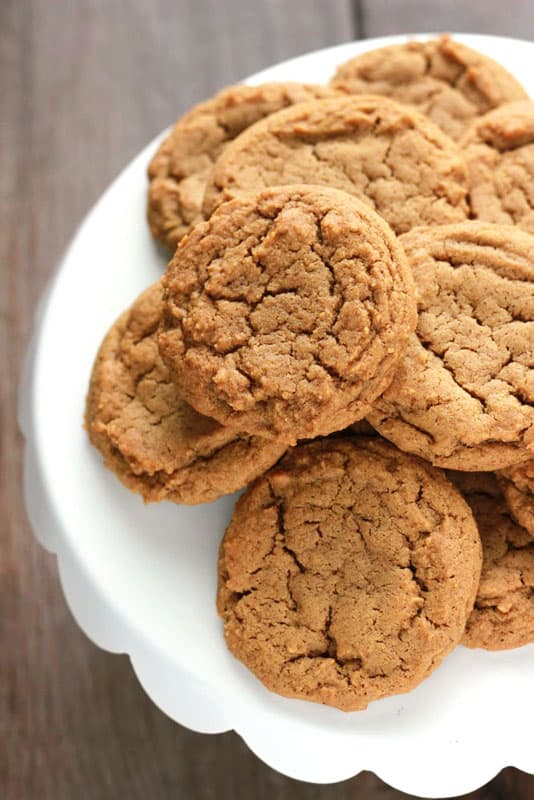
Maple Bacon Donuts are proof that breakfast doesn’t have to choose between sweet and savory—it can have both and look good doing it. These beauties are soft, maple-glazed, and crowned with crispy bacon, because why not start your day like a brunch boss? Trust me, one bite in and you’ll forget all about that sad granola bar.
Love to start your day on a sweet note? Try my cinnamon roll mug cake, apple cider donuts, or pumpkin banana muffins!

Why You’ll Love This Recipe
- Homemade donut recipe – Learn how to make light, fluffy donuts right in your own kitchen.
- Special occasion breakfast recipes – These donuts are made for birthdays, holidays, or just because mornings.
This Maple Bacon Donut recipe is the ultimate breakfast flex—sweet, salty, crispy, and fluffy all in one bite. They start with a soft yeast-raised dough that’s fried to golden perfection, dipped in a rich maple glaze, and finished with a generous sprinkle of crispy bacon. It’s basically everything you love about brunch rolled into one decadent donut.
Don’t be intimidated by the idea of frying at home—this recipe is easier than you think and totally worth the effort. Whether you’re making them for a lazy weekend treat or to impress at brunch, these donuts are guaranteed to disappear fast.


Ingredients You’ll Need
These Bacon Donuts may look bakery-fancy, but the ingredient list is made up of pantry staples you probably already have on hand. Here’s what you’ll need and a few helpful tips to make sure every bite turns out just right.
- Active dry yeast – This helps your donuts rise and puff up. Make sure it’s fresh—expired yeast is a total recipe buzzkill.
- Warm milk and water – The perfect temp is between 100–110°F to wake up the yeast without killing it.
- Sugar – A little sweetness for the dough and to feed the yeast.
- Salt – Just enough to balance out the sweet and enhance the overall flavor.
- Egg – Adds richness and structure to the dough. Room temp is best.
- Butter – Melted and mixed into the dough for that soft, tender texture.
- Flour – All-purpose works great here—don’t pack it into the measuring cup.
- Oil for frying – Use a neutral oil like vegetable or canola with a high smoke point.
- More butter – This time for the glaze. Because we’re not here to skimp.
- Maple syrup – Go for pure maple syrup for the best flavor—it makes all the difference.
- Powdered sugar – Whisked into the glaze to give it that silky-smooth finish.
- A pinch of salt – A little salt in the glaze adds depth and balances the sweetness.
- Bacon – Crispy, salty, and the star of the show. Cook it up and crumble it right on top.
Once you’ve gathered your ingredients, you’re halfway to donut glory. Let’s roll up our sleeves and get frying!

Jesseca’s Recipe Review
These donuts are the definition of worth it. Soft, fluffy, fried to golden perfection, and that maple glaze? Dreamy. But it’s the crispy bacon on top that seals the deal—salty, sweet, and seriously addicting. I tested this recipe more times than I’ll admit, and every batch disappeared faster than I could hide one for later.
Tip from Jesseca:
Don’t skip the second rise after cutting the donuts! That extra 15 minutes gives them the perfect puff and keeps them light and airy when fried.

Substitutions and Variations
Want to mix things up or work with what you’ve got? These Maple Bacon Donuts are surprisingly flexible—here’s how to make them your own:
- No maple syrup? Swap with honey or brown sugar mixed with a splash of maple extract for that signature flavor.
- No active dry yeast? Instant yeast works too—just skip the proofing step and mix it right in with the dry ingredients.
- Bacon alternatives: Try turkey bacon or even candied pecans if you want a meat-free crunch.
- Spice it up: Add a pinch of cinnamon or nutmeg to the dough or glaze for a warm, fall-inspired twist.
Whether you’re keeping it classic or trying something new, this recipe is all about bold flavors and easy options.

How To Make Maple Donuts With Bacon
Making Maple and Bacon Donuts at home is surprisingly easy—and totally worth it. Here’s a quick peek at what to expect so you can plan ahead and get those deliciously crispy results on your first try.
- Prep: Measure your ingredients and start proofing your yeast in warm milk. This gives it time to bloom while you read through the rest of the steps.
- Mix: Once the yeast is foamy, mix up your dough. A stand mixer makes this fast—just about 5 minutes of kneading and you’re good.
- Rise: Let the dough rest for about an hour until it doubles in size. Roll it out, cut your donuts, then rest again for 15 minutes.
- Cook: Heat your oil to 350°F. Fry each donut for about 40 seconds per side until golden, then move them to a cooling rack.
- Dip: Whisk up that maple glaze and dunk the tops of each donut while still slightly warm. Finish with a sprinkle of crispy bacon.
These are best warm, but if you’ve got any leftovers… they still taste like breakfast heaven.

Storage and Make-Ahead Instructions
These donuts are best fresh, but you can prep ahead or stash a few for later—because future you deserves a treat too.
- To store: Once cooled and glazed, place the donuts in a single layer in an airtight container. They’ll keep at room temperature for up to 1 day or in the fridge for up to 3 days. Just note: the glaze may soften and the bacon can lose its crispiness over time.
- To make ahead:
– Dough: Make the dough the night before and let it rise in the fridge (covered) overnight. Bring to room temp before rolling and frying.
– Bacon: Cook and crumble the bacon in advance—store it in the fridge and re-crisp in the oven for a few minutes before using.
– Glaze: The glaze can be mixed ahead and stored in the fridge. Just give it a good stir or a quick zap in the microwave before dipping. - To freeze (unglazed): Fried but unglazed donuts can be frozen in a zip-top bag for up to 2 months. Thaw, warm slightly, and glaze fresh for a nearly-from-scratch finish.

Recipe FAQs and Helpful Tools
Yep! Just be ready for a little arm workout. Knead by hand for about 8–10 minutes until the dough is soft, smooth, and slightly tacky.
Nope! You can swap in instant yeast—just skip the proofing step and mix it straight into the dry ingredients.
Double-check your yeast. If it didn’t foam during proofing, it might be expired or your milk was too hot and killed it (ideal temp is 100–110°F).
Use a neutral oil with a high smoke point like canola, vegetable, or peanut oil. Avoid olive oil—it’s too flavorful and not ideal for high heat.
- Stand Mixer: This dough comes together best with a stand mixer (affiliate) fitted with the paddle attachment. However, you could start with a hand mixer and knead the dough by hand if needed.
- Electric Skillet: Not necessary, but an easy way to ensure you keep your temperature right at 350 degrees while frying. This electric skillet (affiliate) is surprisingly one of my favorite kitchen tools.
- Tongs: Do NOT try to touch these donuts while they are in the oil. Use tongs (affiliate) or a long skewer to flip and pull these out of the oven.

Want to save this recipe?
Enter your email below & we’ll send it to your inbox. Plus get great new recipes from us every week!
Maple Bacon Donuts
Ingredients
Donuts
- 1¼ oz package yeast
- 2 tablespoons warm water
- 3/4 cups warm milk
- 1/4 cup sugar
- 1/2 teaspoon salt
- 1 large egg
- 2½ tablespoons melted butter (or shortening)
- 2½ cups all-purpose flour
- 1-2 quarts oil (for frying)
Glaze
- 3 tablespoons butter
- 1/2 cup maple syrup
- 1/4 teaspoon maple extract
- 1¾ cup powdered sugar
- pinch salt
- 6-12 slices cooked bacon (crumbled)
Instructions
For the Dough:
- Measure everything out first for a smooth process. Begin proofing the yeast by combining it with warm milk (100–110°F). Let it sit for 5–10 minutes until it becomes foamy. This means it’s activated and ready. Tip: read through the full instructions before starting to map out your timing.
- Once your yeast is ready, mix in the remaining dough ingredients. If using a stand mixer with a dough hook, knead on medium speed for about 5 minutes until the dough is soft and slightly tacky. You can also do this by hand—just knead for 8–10 minutes.
- Place the dough in a lightly greased bowl and cover with a clean towel. Let it rise in a warm spot for about 1 hour or until doubled in size. Punch it down, then roll out on a floured surface to ½-inch thick. Use a donut cutter (or biscuit cutter + bottle cap) to cut your shapes. Transfer to a parchment-lined tray, cover, and let rest 15 more minutes.
- Heat oil in a heavy-bottomed pot to 350°F. Carefully lower in a few donuts at a time, frying for about 40 seconds per side or until golden brown. Use a slotted spoon to transfer them to a cooling rack lined with paper towels.
For the Glaze:
- While the donuts cool slightly, stir together melted butter, maple syrup, powdered sugar, and a pinch of salt until smooth. Dip the tops of each donut into the glaze and immediately top with crumbled bacon pieces.
- Enjoy while warm for that just-fried texture! Leftovers can be stored in an airtight container for 1–2 days, but they’re definitely best day-of.
Notes
- Prep the dough through the initial mixing. Before allowing the dough to rise, cover tightly and place in the refrigerator. The dough can stay refrigerated up to 12 hours.
- When ready to cook, remove from the refrigerator and allow to rise in a warm area until doubled.
- Follow the instructions for cooking.
Equipment
Nutrition
The nutrition facts provided are calculated using a third-party tool and are estimates only. Actual nutritional content may vary based on the ingredients and brands you use, as well as portion sizes. For accurate results, please consult a registered dietitian or nutritionist.


Who doesn’t love a good salty/sweet combination? It’s a taste I find myself drawn to more and more! xoxo
Now that’s my kind of donut! Obsessed with maple bacon, although I have never baked anything maple bacon myself. I guess I better get to re-creating that combo in my own house!
Brilliant! I’m pinning and trying these soon! I can’t even believe the combo… My mouth is watering! Once again, brilliant!!!
Mmmm…these look amazing! What a perfectly balanced recipe and a gorgeous end result! Pinning to my “Creative Yummery: Doughnuts” board.
I can’t wait to make these for my bacon obsessed sister she’s gonna flip. yum!
We just tried maple bacon donuts for the first time, not too long ago, and they were amazing. I can’t wait to try these
The Salt and Sweet combo gets me every time! Can’t wait to try! Thanks lady!