
Pumpkin Dog Treats
This post may contain affiliate links.
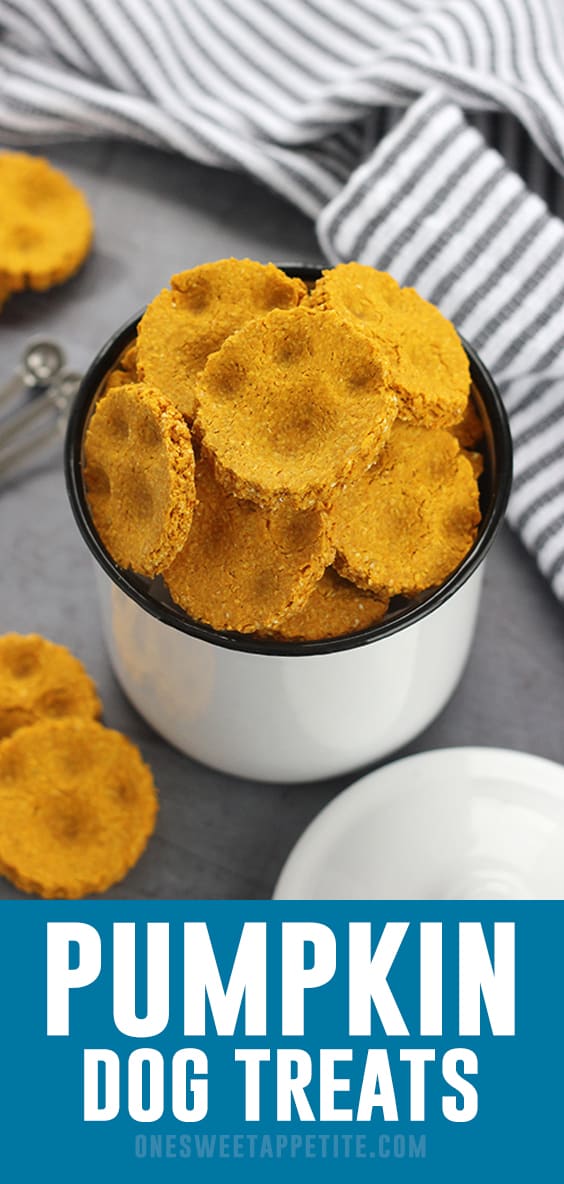
Pumpkin Dog Treats are the easiest way to spoil your pup with something homemade, and they only take a few minutes to mix up. If your dog goes wild for peanut butter and pumpkin, these are about to become a favorite, mine start hovering the second I grab the mixing bowl. I’ve made these enough times to know simple ingredients really do the trick here, and chances are you already have everything you need in your kitchen.

Reasons To Make These Dog Treats
- Dog treat recipe with peanut butter. A guaranteed hit. Most dogs go wild for peanut butter, and it helps bind the dough.
- Oat flour dog treats. Great for pups with wheat sensitivities; oat flour is gentle on the stomach.
- Dog treats without preservatives. Homemade means no fillers, additives, or questionable ingredients.
Pumpkin Dog Treats are one of those simple recipes I come back to when I want something quick and homemade for my dogs. They’re made with pantry staples like pumpkin, peanut butter, and oat flour, and bake up into crunchy little bites that are easy to keep on hand.
I’ve made these for my own dogs more times than I can count, and they’re always the first thing they go for when I open the container. It’s a straightforward recipe that doesn’t take much effort, and it’s easy to adjust depending on what you have in the kitchen.

Dog Treat Ingredients
These homemade dog treats come together with just a few pantry staples, and every ingredient serves a purpose your pup will love. Here’s what you’ll need:
- Pumpkin purée: Use plain canned pumpkin with no added sugar or spices. It’s great for your dog’s digestion.
- Eggs: Help bind the dough and add a boost of protein and healthy fats.
- Peanut butter: Go for natural peanut butter with no added sugar, salt, or xylitol (always double-check the label).
- Oat or whole wheat flour: Oat flour is ideal for sensitive stomachs, while whole wheat offers more structure, both are safe and nutritious.
- Cinnamon (optional): Adds a warm scent dogs love. Just a pinch is plenty; skip it if your dog has a sensitive tummy.
These ingredients are simple, wholesome, and dog-safe, making this treat recipe a smart (and tail-wagging) choice for your four-legged friend.

Jesseca’s Recipe Review
These Dog Treats have become a regular in our kitchen. I’ve made them more times than I can count. They’re quick, budget-friendly, and most importantly, our dogs go wild for them. It feels good knowing exactly what’s in their snacks.
Tip from Jesseca:
For extra crunch (and longer shelf life), turn off the oven after baking and let the treats sit inside with the door cracked open for 15–20 minutes. They’ll crisp up without overbaking.
Substitutions
These homemade dog treats are easy to customize based on what you have in your pantry or your pup’s dietary needs. Here are a few simple swaps and fun add-ins to try:
- Flour: Swap oat flour with whole wheat, brown rice flour, or a gluten-free blend if your dog has sensitivities.
- Peanut butter: You can also use unsweetened almond butter, just double-check that it’s xylitol-free.
- Add-ins: Stir in a tablespoon of ground flaxseed or chia seeds for added fiber and nutrients.
- Cinnamon: Totally optional. Skip it for pups with sensitive stomachs or if you want a more basic treat.
- Texture: For a softer treat, bake for 15–18 minutes instead of 20, or use silicone molds for shaping instead of rolling and cutting.
This recipe is super flexible, which makes it easy to tailor to your dog’s tastes or whatever’s already in your kitchen.

How To Make Oat Flour
No oat flour on hand? No problem. You can make it in seconds.
- Add rolled oats or quick oats to a blender or food processor and pulse until they reach a fine, powdery texture.
- 1 cup of oats will yield about 3/4 cup of oat flour. It’s budget-friendly, easy, and perfect for dog treats!

Pumpkin Dog Treat Recipe
Here’s how easy these are to make: Just a few steps, one bowl, and your pup will be drooling in no time.
- Mix together pumpkin, eggs, and peanut butter.
- Stir in flour and cinnamon until a soft dough forms. Add more flour as needed until the dough is no longer sticky.
- Roll out the dough to about 1/4–1/2 inch thick.
- Cut into shapes using your favorite cookie cutters.
- Bake at 350°F for 20 minutes or until crisp.
These are perfect for a weekend baking session with the kids or just a quick way to treat your furry best friend.

Questions You Might Have
Yes! Just make sure it’s plain, cooked pumpkin purée—not pie filling. Drain excess liquid so the dough doesn’t get too wet.
As long as it does NOT contain xylitol, which is toxic to dogs. Always check the label—even natural brands.
Oat flour is gentle on digestion and gluten-free, while whole wheat flour gives the treats more structure. Both are safe—just avoid almond or coconut flour unless you know your dog tolerates it.
Absolutely! Roll and cut the dough, then freeze the unbaked treats on a baking sheet. Once frozen, transfer to a bag and bake from frozen—just add a few extra minutes to the baking time.
Storage and Make-Ahead Instructions
These are perfect for prepping ahead and storing for later, whether you’re baking a batch for the week or stocking up for the month.
- Make-ahead: You can mix and roll the dough, then cut the treats and freeze them unbaked. When you’re ready, bake straight from frozen. Add 2–3 extra minutes to the bake time.
- Storage: Once baked and cooled, store treats in an airtight container at room temperature for up to 5–7 days. For longer freshness, refrigerate for up to 2 weeks.
- Freezing: These freeze beautifully! Store cooled treats in a freezer-safe bag or container for up to 2 months. Let them thaw at room temp or give them to your dog frozen as a cool summer snack.

Want to save this recipe?
Enter your email below & we’ll send it to your inbox. Plus get great new recipes from us every week!

Pumpkin Dog Treats
Ingredients
- 1 cup pumpkin
- 2 eggs
- 3 tablespoons peanut butter (, please be sure your peanut butter does not contain xylitol)
- 2½- 4 cups Oat flour or wheat flour
- 1/2 teaspoon cinnamon (optional)
Instructions
- Preheat the oven to 350°F. Line a baking sheet with parchment paper or a silicone baking mat.
- In a large mixing bowl, whisk together the pumpkin, eggs, and peanut butter until smooth and well combined.
- Stir in 2½ cups of oat flour and the cinnamon (if using) until a soft dough begins to form.
- Gradually add more flour—1 tablespoon at a time—until the dough is no longer sticky and easy to roll.
- Lightly flour your surface and roll the dough out to 1/4 to 1/2 inch thickness. Cut into shapes with cookie cutters.
- Place treats on the prepared baking sheet and bake for 20–22 minutes, or until crisp and lightly golden.
- Let the treats cool completely before serving or storing. They will firm up as they cool.
Nutrition
The nutrition facts provided are calculated using a third-party tool and are estimates only. Actual nutritional content may vary based on the ingredients and brands you use, as well as portion sizes. For accurate results, please consult a registered dietitian or nutritionist.
Like this recipe? You will love my Easy Dog Treats, Pumpkin Pie Granola, Pumpkin Cheesecake Bars, and Homemade Pumpkin Spice Coffee Creamer!


Perfect treat for my dog. I used silicone molds of little bones and paw prints because the dough seemed too sticky for cut out cookies. I did try a few cookie cutter treats, but the recipe worked much better for me in the silicone molds. My dog, a two neighbor dogs absolutely loved the treats for Christmas.
Thank you so much for sharing your experience! I love the idea of using silicone molds—those little bones and paw prints sound absolutely adorable. I’m so glad your pup and the neighbor dogs enjoyed the treats; what a sweet way to spread holiday cheer!
Perfect treat for my miniature schnauzer and easy to make!
We have a mini schnauzer also! I’m so glad yours likes these treats.
I two two different sized cans of pumpkin.
These are very similar to cookies made for human consumption. If I don’t freeze those or even put them in an air tight container why would I have to do it for these? Do they dry out or become too hard to eat? Thanks.
Just my suggestion to keep them fresh longer. They will go bad quicker if not stored properly.
Can you use coconut flour?
Hi Gina,
I have personally never used coconut flour. However, my vet has told me that it is a healthy option for our dog. I’d say that it is up to you and what you think is best for your pet. It should work similarly in this recipe.
I made these and my dog loves them. However, even after being stored in a container, 4 days later there was mold growing on them! Good thing I didn’t give them for Christmas!
Yikes! I have never had that issue. Something I will have to look into. Glad you didn’t give them away.
I do suggest storing them in a quality air tight container or in the freezer.
I came upon this recipe through Facebook. Then reading about them I found you had a schnauzer! We’re picking our miniature up in about 8-9 weeks as it was only born 2 weeks ago . I’m Looking forward to making these as I know they are great for our dog breed also! Plus I keep all these ingredients regularly in our cupboard even the banana someone mentioned. Do you use quick oats or rolled oats when processing? I also can’t believe that Harvey is your pups name, our dog will be Harley or Harvey lol. Thanks again
My pup is having tummy troubles lately (finding out she has a very sensitive system) and came back to your recipe (had it pinned). Nowadays it seems safer for the doggies to make yourself what you give them due to sensitivities and recalls. I chose to try it your way by making my own oat flour. I left it slightly coarse and they look delicious. I have spent the day doing a purge of anything that might be effecting her negatively. I am hoping your treats are the ticket to Baylee starting to feel better. Thank you for the all natural treat recipe!
As a fellow dog mom to a pup with sensitive stomach issues, I applaud you for taking the extra steps to making sure your fur baby is taken care of. I hope these treats work out for your little one!
Thank you for this easy and puppy-approved recipe! I replaced the eggs with one ripe banana because I am vegan and therefore do not keep any eggs in the house. I also found that 20 minutes was my ideal baking time for these treats. My puppy loved these, and I loved seeing him enjoy them!
What a great idea to substitute the eggs with banana. I am going to have to try that for sure!
Can you substitute with coconut flour??
I have never substituted coconut flour in these. If you find that it works well I would love to know!
Cannot wait to make these for my little pup, who is also named harvey! He loves pumpkin, so I think these will be a favorite!
What a wonderful name! We can’t wait for your fluffy pup to enjoy his treats!
wonderful and ez recipe! thank you for sharing!!! now, how did you get to stamp the cute paw prints?
How many treats does this recipe make?
Hi Stacy. It depends on the size of the cookie cutter you are using. We got 12 large treats.
Thanks for recipe, the fur babies loved them so did my feathered babies (chickens)
I love that you shared with you chickens! It’s one of my goals to get chickens as soon as we have a space for them!
Are these supposed to be super crunchy or still a little soft? We made a batch this morning and left them in the oven for 15 minutes but they are not super hard like normal dog biscuits so just wanted to make sure what the consistency is supposed to be. Thanks!!
Ours were softer. You did it right.
Remember to check your peanut butter for the poisonous (to pets) artificial sweetener they put in peanut butter.
That is an excellent reminder! You don’t want to use any brands that contain Xylitol.
Thank you for this recipe. I have been looking for awhile now for an alternative dog treat since I read a post about the dangers of store bought treats. All of the other recipes that I have come across have either used expensive ingredients or they only lasted a few days. Do you think that they would be OK for cats too?
I hope they work out for you! As for the cat question, I’m not sure. I would do some research before giving them to any feline friends.
Cats shouldn’t eat a lot of non-meat proteins. They’re considered true carnivores, so they need proteins differently than dogs. They don’t taste “sweet” stuff. Their tastebuds don’t pick up on sweet. However, I see nothing in these that would hurt a cat. They’re healthier than the big store treats. Always ask your vet, of course. My cat likes pastry 🤷🏻♀️. I’m a tech, so always verify info w the dr. since they know your pet and history.
Thanks for the great info, Jennifer!
How long are they good for
If stored in the refrigerator in an air tight container they can stay good for up to two months.
If in the freezer in an air tight container you’ve got about 8 months. Just bring to room temp before serving.
Thank you for this recipe. I’m going to be making them for my neighbors dogs. I live in senior housing and most of the residents have dogs. I think all the dogs will enjoy them. Just wondering what other ingredients could I add to make different ones. I would like to make a few different kinds for all the dogs. Since many of the owners don’t have extra money for treats. Thank you so much all the dogs will love them.
Just made these tonight…actually made a double batch, because I happened upon an excess of pumpkin purée. I put half of the dough in the freezer; we will see how it keeps, but I imagine it will do just fine. My pup Josie did the taste test and SUCCESS! I’m giving some to my neighbor’s pup and my co-workers’ babies. These are the simplest dog biscuits I’ve ever made. Thank you for the recipe! It’s going to be fun to add different veggies into this basic mix and see what comes out.
These are so stinkin’ cute!!! I love them, and Harvey is just too dang adorable!
Thanks!! He is so big. This recipe was actually fun to make with dax. He loves to spoil Harvey.