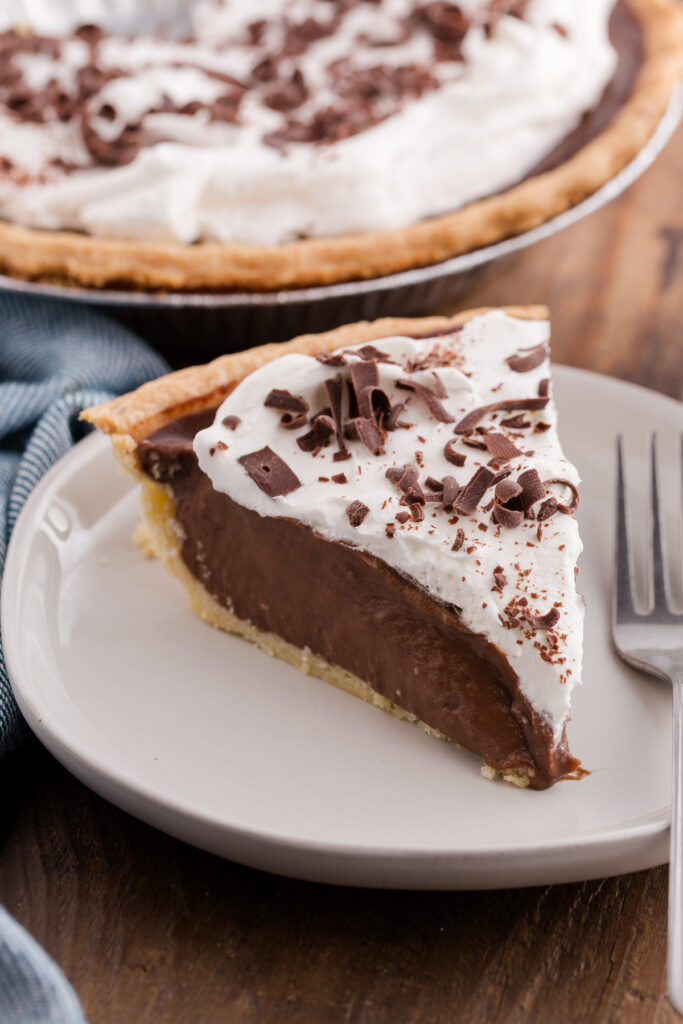
Chocolate Cream Pie
This post may contain affiliate links.
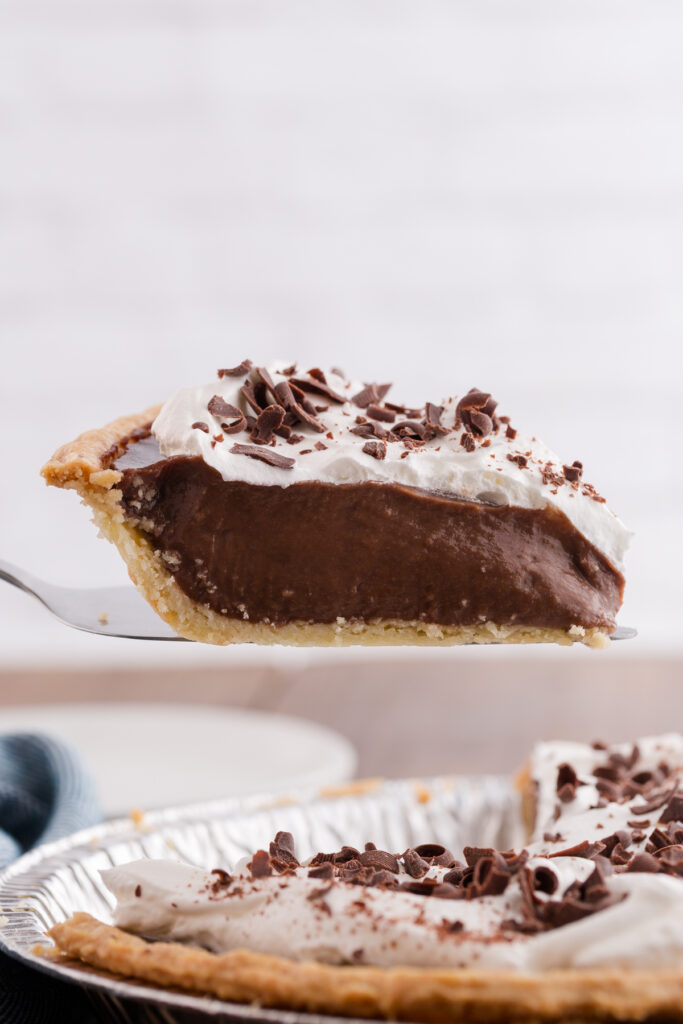
This chocolate cream pie is the kind of dessert that makes you close your eyes after the first bite. It’s silky, rich, deeply chocolatey, and somehow still feels light with that fluffy whipped topping on top. If you’ve ever wanted a classic, no-fuss pie that tastes like it came straight from grandma’s kitchen but doesn’t require anything fancy, this is it.
Why This Easy Chocolate Pie Is A Keeper
- Easy dessert recipe. No complicated steps or specialty ingredients, just simple pantry staples that work every time.
- Classic family favorite. It’s the kind of old-school pie everyone recognizes and happily says yes to.
- Great make ahead dessert. It needs time to chill, which means you can prep it hours before guests arrive and forget about it.
- Budget friendly recipe. Milk, sugar, cocoa, eggs… nothing fancy or expensive hiding in the ingredient list.
There’s something about a delicious pie sitting in the fridge that feels like a little insurance policy for the day. Bad mood, long afternoon, unexpected company… suddenly you’re the person who casually says, “Oh, I have pie.” The filling turns thick and glossy on the stove, pours into the crust like velvet, and after a few hours in the fridge you’ve got what honestly tastes like the best chocolate pie ever.
I’ve tested this recipe more times than I can count, tweaking the cocoa, adjusting the cook time, and making sure the texture sets perfectly without turning grainy or too stiff. After feeding very honest taste testers at my table, this is the version that gets clean plates every single time. It’s simple, reliable, and exactly what you want when you’re craving something classic and chocolate-forward.

Before You Start Baking
This pie proves you don’t need anything fancy to make something incredible. A handful of simple, quality ingredients come together to create that smooth, rich filling that sets up beautifully every time.
- White Sugar. Regular granulated sugar works perfectly. Make sure it’s fresh so it blends smoothly with the eggs.
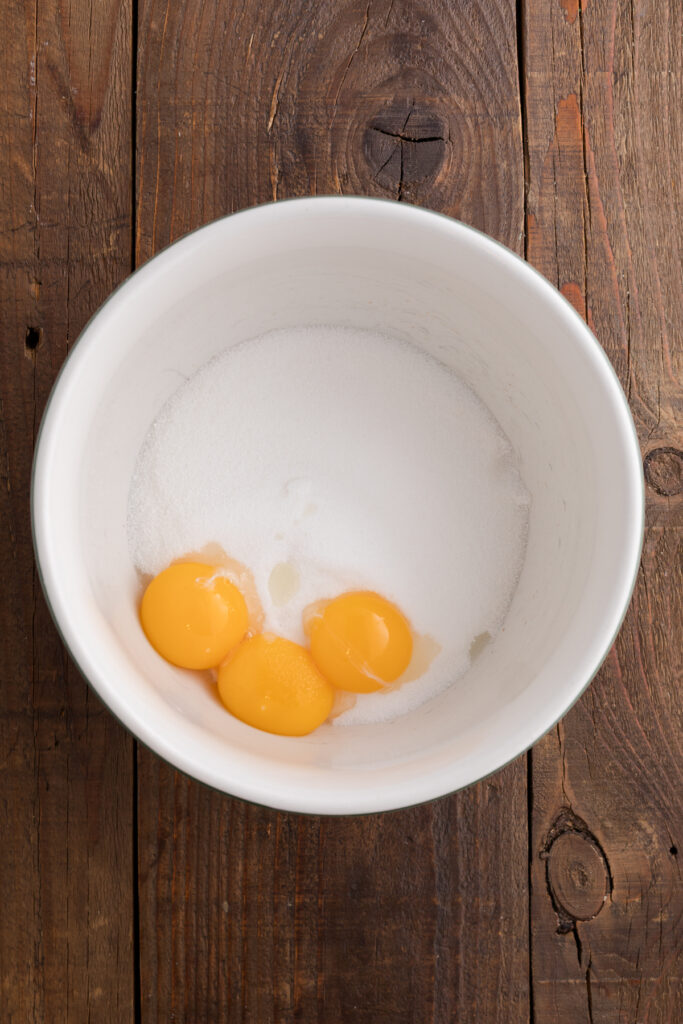
- Egg Yolks. Use large eggs and separate them carefully. Yolks give the filling its rich, custard-like texture.
- Unsweetened Cocoa Powder. Since chocolate is the star, use a good-quality cocoa. Natural cocoa is classic, while Dutch-processed gives a darker flavor.
- Cornstarch. This thickens the filling. Measure carefully and whisk well to prevent lumps.
- Vanilla Extract. Use pure vanilla if possible. It rounds out and deepens the chocolate flavor.
- Baked 9-inch Pie Crust. A store-bought crust keeps this easy, just make sure it’s fully baked and cooled.
- Whipped Topping. Frozen whipped topping keeps things simple, or swap for homemade whipped cream.
Everything is easy to find and budget friendly. With basic pantry staples and a little stirring, you’ll get a silky chocolate cream pie that tastes like you worked much harder than you did.

Jesseca’s Recipe Review
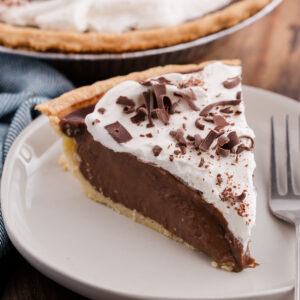
There’s just something about a homemade chocolate pie that feels comforting in the best way. The filling is smooth and rich without being too heavy, and once it’s fully chilled, it slices beautifully while still staying soft and creamy. It’s classic chocolate flavor done right, simple, nostalgic, and always a crowd-pleaser.
Tip from Jesseca:
When cooking the filling, stir constantly and keep the heat at medium. It can feel like it’s taking a minute to thicken, but patience gives you that silky texture without any scorched spots on the bottom of the pan.

Customizing Your Old Fashioned Chocolate Pie
One of the best things about this pie is how easy it is to adjust without messing up the texture. It’s forgiving, flexible, and still turns out delicious.
- Swap the crust. Use a graham cracker crust or chocolate cookie crust for a slightly different flavor and a little extra texture. Both work beautifully with the creamy filling.
- Make it extra chocolatey.. Stir in a small handful of mini chocolate chips right after cooking the filling. They’ll melt slightly and boost the richness.
- Add a seasonal twist. Top with fresh berries in the summer, crushed peppermint during the holidays, or even a drizzle of caramel in the fall. The base stays the same, but the vibe shifts easily.
- Adjust for dairy needs. You can use 2% milk without changing much. For dairy-free, try a full-fat plant-based milk like oat or coconut and a dairy-free butter substitute, just make sure it’s one designed for cooking so the filling still thickens properly.
- Lower the sweetness.. If you prefer a darker chocolate flavor, reduce the sugar slightly or use a Dutch-processed cocoa for a deeper taste.
The base recipe is solid, which means you can make it fit your table, your season, and your preferences without turning it into a science project.

How to Make This the Best Chocolate Pie Ever
If you want this to truly taste like the best chocolate pie ever, it comes down to paying attention to the small things.
- First, don’t rush the stovetop step. The filling should gently come to a boil while you’re stirring, not explode into one. That slow build is what gives you that smooth, pudding-like texture instead of something grainy.
- Second, use good cocoa. It doesn’t have to be expensive, but fresh, high-quality cocoa makes a noticeable difference since chocolate is the entire personality of this pie.
- And finally, let it chill completely. I know it’s tempting to slice early, but the magic happens in the fridge. A fully set pie gives you clean slices, creamy texture, and that classic, bakery-style look that makes everyone think you worked way harder than you did.

Everything You Need to Know About Chocolate Pie
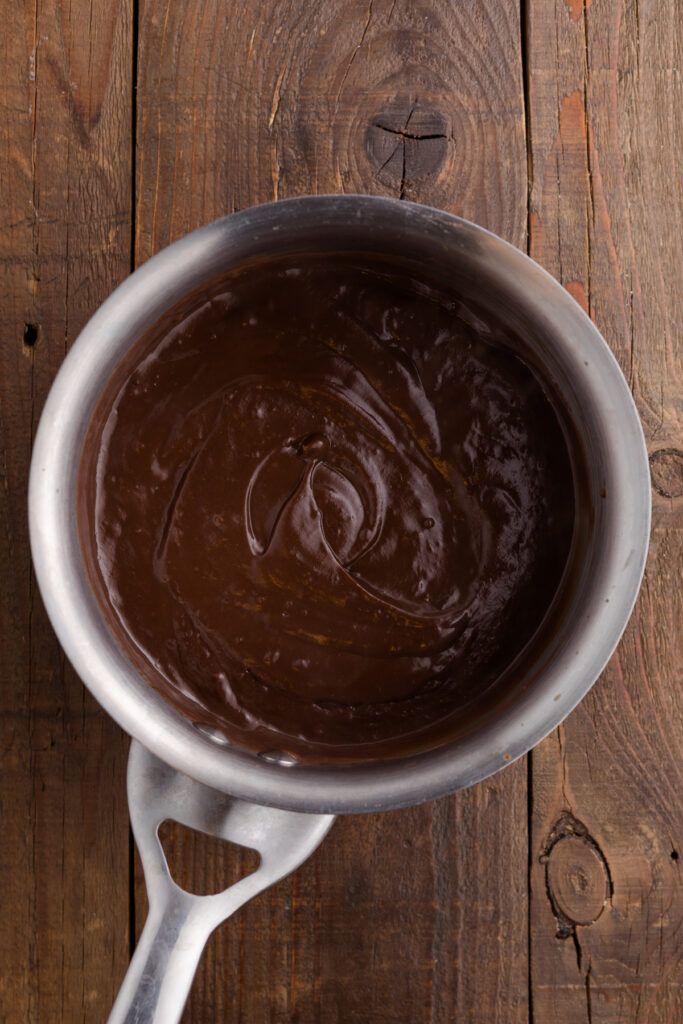
It should coat the back of a spoon and hold a clean line when you drag your finger through it. If it still looks thin and runny, keep stirring.
Most of the time it just needed a little more cook time or more time in the fridge. Make sure it fully boils and chills for at least 2 to 4 hours.
Absolutely. Just be sure it’s fully baked and completely cooled before adding the filling.
Nope. You can use homemade whipped cream if you prefer. Just whip heavy cream with a little powdered sugar and vanilla until soft peaks form.
It’s not ideal. The texture can change once thawed, so this one is best kept refrigerated and enjoyed within a few days.
Storage and Make-Ahead Instructions
This pie is actually better when it’s made ahead, which makes life a whole lot easier.
- How long does it last? Stored properly in the refrigerator, it will stay fresh for 3 to 4 days. The texture holds up beautifully as long as it’s kept cold.
- How to store it. Cover the pie loosely with plastic wrap or foil and keep it in the fridge. If you’ve already added whipped topping, try not to press the wrap directly onto it so the topping stays fluffy.
- Can you freeze it? Freezing isn’t recommended. The filling can separate or turn slightly watery once thawed, which changes the smooth texture. It’s best enjoyed fresh from the fridge.
- Make-ahead tips. You can prepare the pie up to 24 hours in advance. For the best presentation, add the whipped topping the day you plan to serve it.
- How to serve it later. This pie is meant to be served cold. There’s no reheating needed. If it’s been chilling overnight, just let it sit at room temperature for 10 to 15 minutes before slicing for the creamiest texture.
Keep it simple, keep it chilled, and you’ll have a dessert ready whenever you need it.

Want to save this recipe?
Enter your email below & we’ll send it to your inbox. Plus get great new recipes from us every week!
Classic Homemade Chocolate Cream Pie
Ingredients
- 1 ½ cups granulated sugar
- 3 large egg yolks (beaten)
- ½ cup unsweetened cocoa powder
- ¼ cup cornstarch
- ½ teaspoon salt
- 3 cups milk (whole preferred)
- 2 tablespoons butter
- 1 ½ teaspoons vanilla extract
- 1 9-inch baked pie crust, completely cooled
- 1 cup frozen whipped topping (thawed)
Instructions
- In a large mixing bowl, beat the sugar and egg yolks together until smooth and creamy.
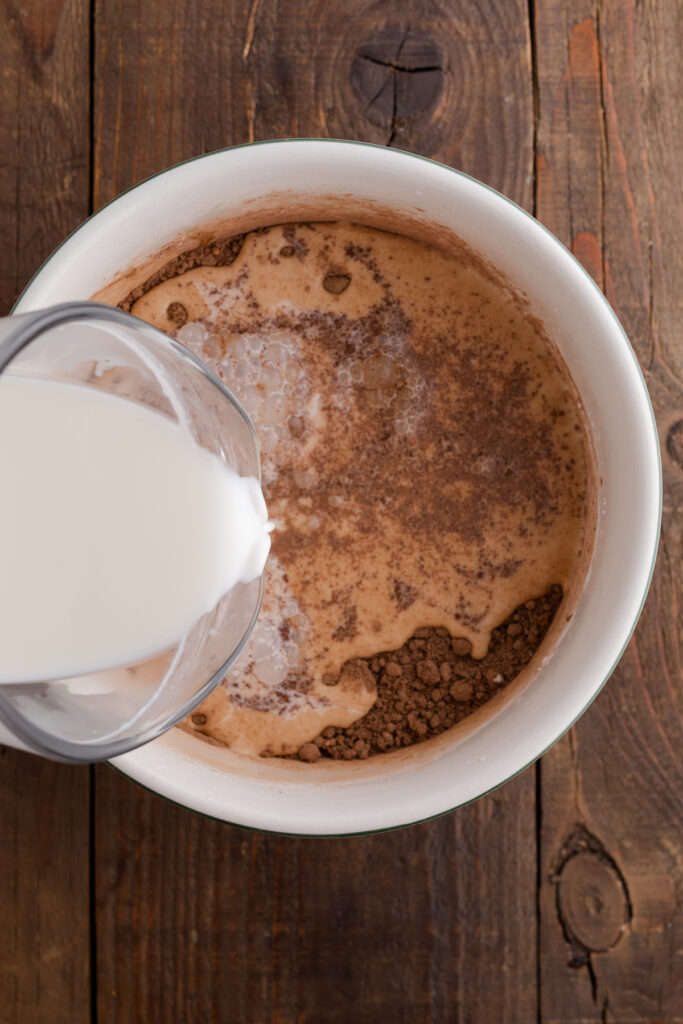
- Whisk in the cocoa powder, cornstarch, and salt until fully combined and no dry streaks remain.
- Slowly stir in the milk until the mixture is smooth and well blended.
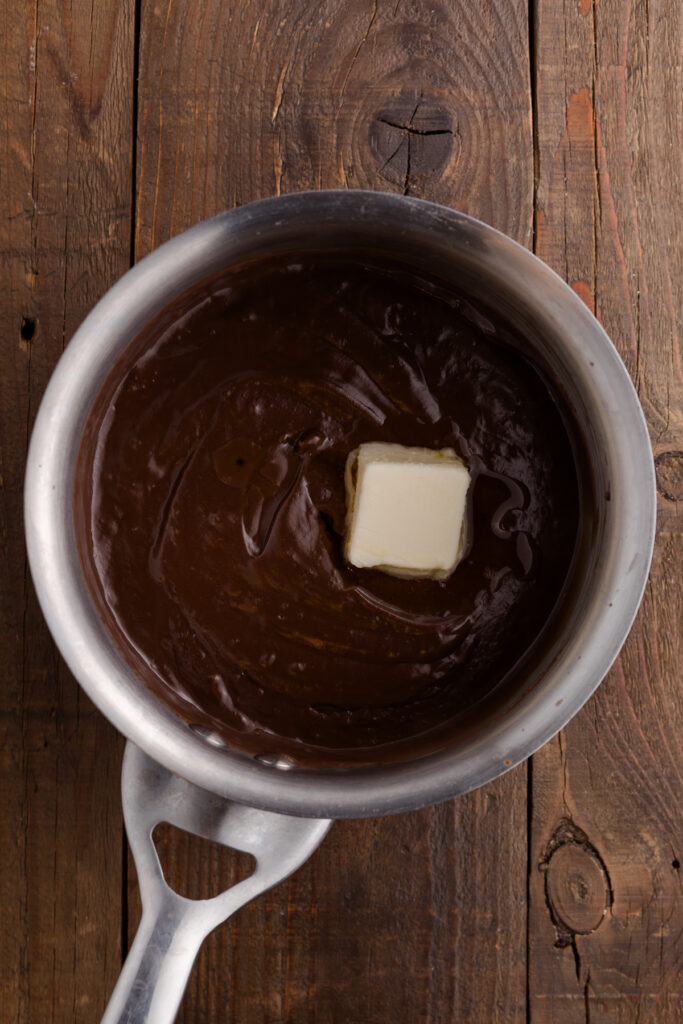
- Pour the mixture into a large, heavy-bottomed saucepan. Cook over medium heat, stirring constantly, until the mixture comes to a gentle boil and thickens enough to coat the back of a spoon, about 5 to 7 minutes.
- Remove the pan from the heat. Stir in the butter and vanilla extract until smooth and glossy.
- Pour the warm filling into the baked and cooled pie crust. Smooth the top with a spatula.
- Refrigerate the pie for at least 2 to 4 hours, or until fully set.
- Top with whipped topping just before serving. Slice and serve chilled.
Notes
- Stir constantly while cooking to prevent scorching.
- The filling is ready when it thickly coats the back of a spoon.
- For the cleanest slices, chill closer to 4 hours and wipe your knife between cuts.
The nutrition facts provided are calculated using a third-party tool and are estimates only. Actual nutritional content may vary based on the ingredients and brands you use, as well as portion sizes. For accurate results, please consult a registered dietitian or nutritionist.