
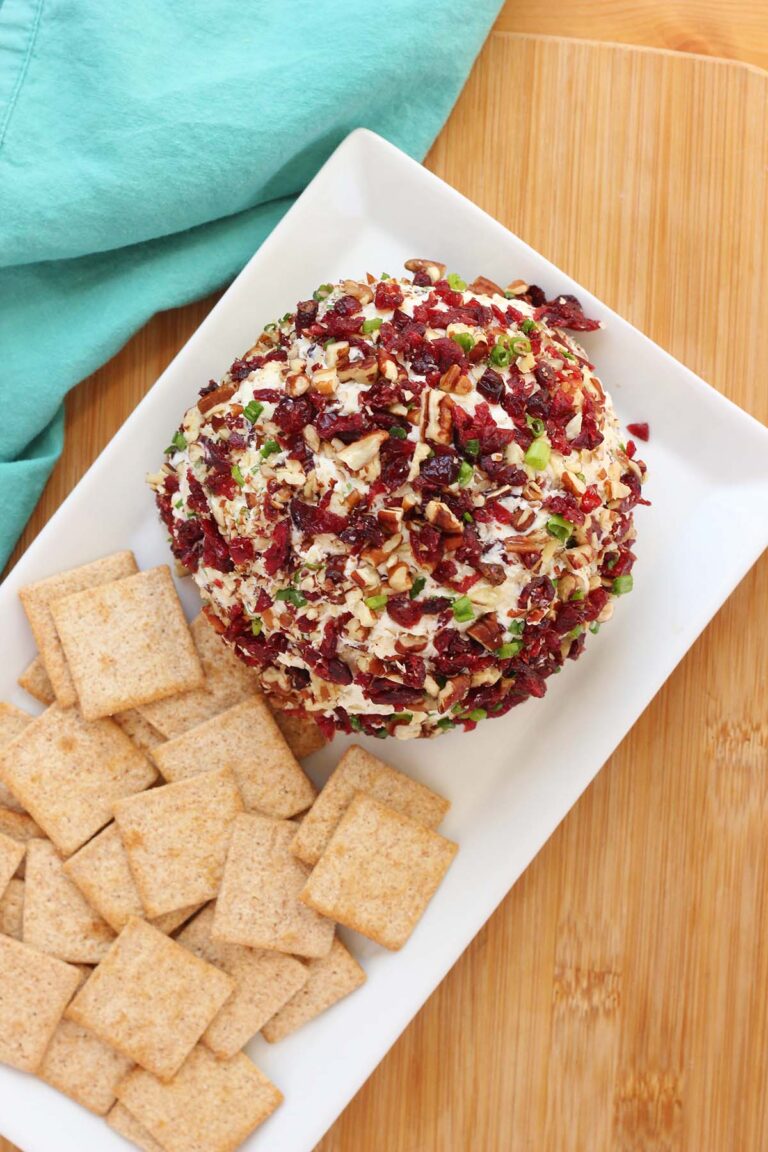
Jalapeno Popper Cheese Ball
This post may contain affiliate links.
This Jalapeño Popper Cheese Ball is everything you love about the classic appetizer. Creamy, spicy, and loaded with bacon. It’s quick to make, always a crowd favorite, and the kind of recipe you’ll be asked for again and again. If you’re looking for a no-fuss appetizer that delivers big flavor, you’ve officially found it.
This recipe was heavily inspired by my traditional cheese ball recipe. If you haven’t given that one a try, add it to your must-make list!

Why This Cheese Ball’s a Keeper
- Make-ahead appetizer recipe: You can prep this cheese ball a day in advance, making entertaining less stressful and way more delicious.
- Game day snack idea: Creamy, cheesy, and perfect with crackers—this belongs on every tailgate table.
- Holiday cheese ball recipe: It’s festive, flavorful, and always one of the first things to disappear at parties.
This Jalapeño Popper Cheese Ball brings all the bold, creamy flavors of your favorite appetizer in an easy, make-ahead party dish. It’s packed with sharp cheddar, crispy bacon, fresh jalapeños, and a hit of ranch seasoning. Basically everything you’d want in a bite-sized snack.
It comes together in minutes, chills until firm, and gets rolled in even more bacon, cheese, and green onion for a finishing touch that’s both pretty and delicious. Serve it with crackers, pretzels, or veggie sticks and watch it disappear fast.
Want even more cheesy goodness? Try my easy Mozzarella Sticks.

Before You Start Mixing
So I’ve talked you into trying this insanely delicious appetizer, now what? Let’s dive into the list of ingredients you’ll need:
- Cheese: There are a couple different cheese types you’ll need for this recipe. Specifically, cream cheese and cheddar cheese. I recommend opting for your favorite brand.
- Sour Cream: Adds creaminess, a little tang, and some moisture that lightens up the density of all that cheese. It’s also the social glue that helps mix other ingredients more evenly.
- Ranch Seasoning: Not ranch dressing. You want the dry seasoning packet.
- Bacon: Cooked and crumbled. I tested this with the bacon crumbles from Costco and those worked too, but the fresh cooked bacon was best.
- Jalapenos: Fresh jalapenos not pickled. Trust me on this one.
- Green Onion: Not much, just a few for the outer coating.

Jesseca’s Recipe Review
This Jalapeño Cheese Ball is hands-down one of my favorite party recipes. It’s creamy, just the right amount of spicy, and ridiculously easy to throw together. Every time I make it, someone asks for the recipe, and honestly, it’s usually gone before I even get a second bite.
Tip from Jesseca:
Use gloves when handling jalapeños to avoid that lingering heat on your hands, and be sure to remove the seeds and membranes if you want a milder bite.

Customize It
This Cheese Ball is easy to customize based on your spice preference, what you have on hand, or the crowd you’re feeding:
- Turn up the heat: Leave in some of the jalapeño seeds or add a dash of hot sauce or diced pickled jalapeños for extra kick.
- Mild version: Swap the jalapeños for mild green chiles or finely chopped bell pepper for all the flavor with none of the heat.
- Cheese swap: Use pepper jack, Monterey Jack, or even a mix of cheddar and mozzarella for a different flavor profile.
- No ranch? No problem—use a mix of garlic powder, onion powder, dried parsley, and a pinch of salt to mimic that ranch flavor.
- Add texture: Roll the cheese ball in chopped nuts like pecans or walnuts for extra crunch.
- Make it mini: Instead of one large cheese ball, divide the mixture into smaller, single-serve cheese balls for easy grab-and-go bites at parties.
With just a few simple tweaks, you can make this recipe work for any occasion or flavor mood.
Helpful Tools
- Rubber Spatula (affiliate): This tool ensures that not a smidgen of your delicious cheese mixture goes to waste. Get every last bit out of the bowl!
- Plastic Wrap (affiliate): Plastic wrap is essential for shaping your cheese ball and storing it in the fridge. Plus, it makes for easy cleanup.
- Serving Platter with Lids (affiliate): A lidded serving platter keeps your cheese ball fresh until it’s showtime. Plus, it adds a touch of elegance to your spread.


Recipe FAQs
Yes! In fact, it’s better that way. Make it up to 2 days in advance and keep it wrapped in the fridge until ready to serve.
With the seeds and membranes removed, it’s mild with just a little kick. For more heat, leave some seeds in or add an extra jalapeño.
Absolutely. Store-bought bacon crumbles work in a pinch, though freshly cooked and crumbled bacon adds better flavor and texture.
Yes! Just mix everything and skip the chilling/rolling step. Spread it into a shallow dish and serve as a cold dip.
Storage and Make-Ahead Instructions
This Jalapeño Popper Cheese Ball is a dream for prepping ahead and storing for later.
- Make-Ahead: You can prepare the cheese ball mixture up to 2 days in advance. Wrap it tightly in plastic wrap and refrigerate until ready to serve. For best texture, roll it in the topping mixture just before serving so it stays fresh and crisp.
- To Store: Store any leftovers tightly wrapped or in an airtight container in the refrigerator for up to 4–5 days. Let it sit at room temperature for 10–15 minutes before serving to soften slightly for easier spreading.
- Freezing: Not recommended. While technically possible, freezing can change the texture and make the cheese grainy once thawed. Stick to refrigerating for the best results.

Want to save this recipe?
Enter your email below & we’ll send it to your inbox. Plus get great new recipes from us every week!

Jalapeno Popper Cheese Ball Recipe
Ingredients
Cheese Ball
- 16 oz cream cheese (softened)
- 1/4 cup sour cream
- 1½ cups sharp cheddar (shredded)
- 1 (1 oz packet) ranch seasoning
- 1 cup bacon (cooked and crumbled)
- 1-2 large jalapenos (seeds and membrane removed and diced)
Topping
- 2 slices bacon (cooked and crumbled)
- 2 green onions (chopped)
- 1/2 cup sharp cheddar (finely shredded)
Instructions
Cheese Ball
- In a large mixing bowl, add the softened cream cheese and sour cream. Use a hand mixer (or a sturdy spatula) to blend until smooth and creamy.
- Mix in 1½ cups of shredded cheddar cheese, the ranch seasoning packet, 1 cup of cooked and crumbled bacon, and the diced jalapeños. Continue mixing until all ingredients are evenly combined and well distributed throughout the mixture.
- Lay a large piece of plastic wrap on a clean surface. Scoop the cheese mixture into the center, then wrap it tightly and shape it into a ball using your hands. Don’t worry if it’s not perfectly round—it will firm up as it chills.
- Place the wrapped cheese ball in the refrigerator and let it chill for at least 4 hours, or overnight if possible. This helps the flavors develop and allows the cheese ball to firm up for easier shaping and coating.
Topping
- On a large plate or shallow dish, combine the remaining ½ cup shredded cheddar cheese, 2 crumbled slices of bacon, and chopped green onions.
- Once the cheese ball has chilled, unwrap it and gently roll it in the topping mixture. Press lightly to help the toppings stick and fully coat the outside.
- Transfer the cheese ball to a serving plate. Serve immediately with your favorite crackers, pretzels, or veggie sticks—or return to the fridge until ready to serve.
Nutrition
The nutrition facts provided are calculated using a third-party tool and are estimates only. Actual nutritional content may vary based on the ingredients and brands you use, as well as portion sizes. For accurate results, please consult a registered dietitian or nutritionist.


I made this cheese ball for a family gathering. It was delicious and a big hit!! Needless to say there was nothing left. The recipe makes a nice sized cheese ball so have plenty of crackers, veggies, etc on hand. So Good!
Jodi, this made my day! I’m so glad it was a hit at your gathering! Love that there were no leftovers—that’s always the best compliment. And yes, it definitely calls for a solid cracker-to-cheese ratio. Thanks so much for trying it and taking the time to share!
Just finished making this cheese ball for a little get-together. It is absolutely delicious and so easy!! I think it’s going to be a big hit. I love it!