
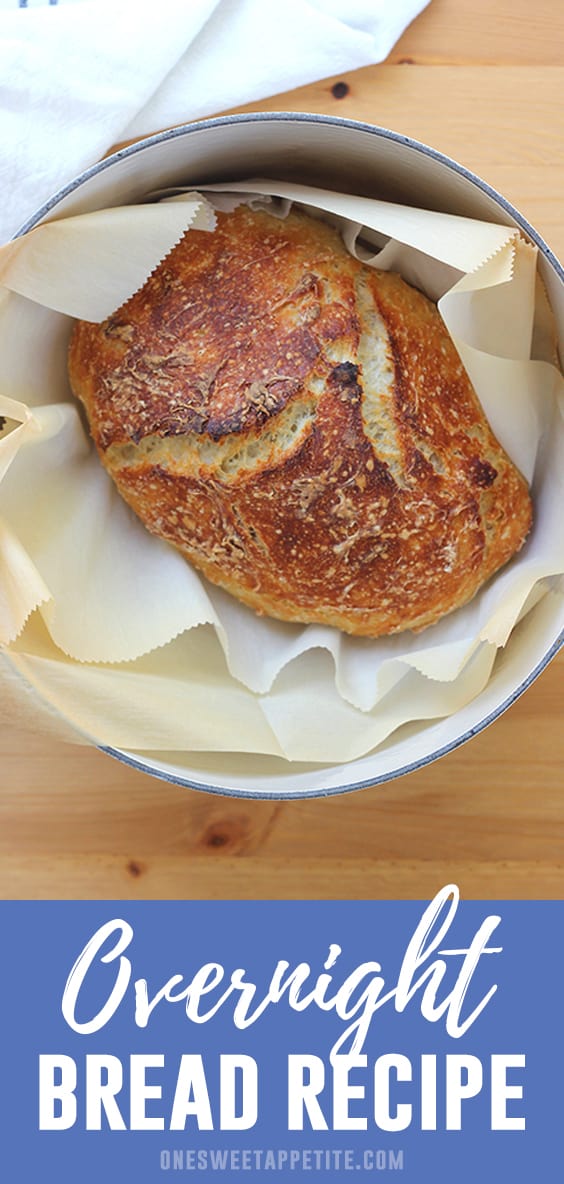
Overnight No Knead Artisan Bread
This post may contain affiliate links.
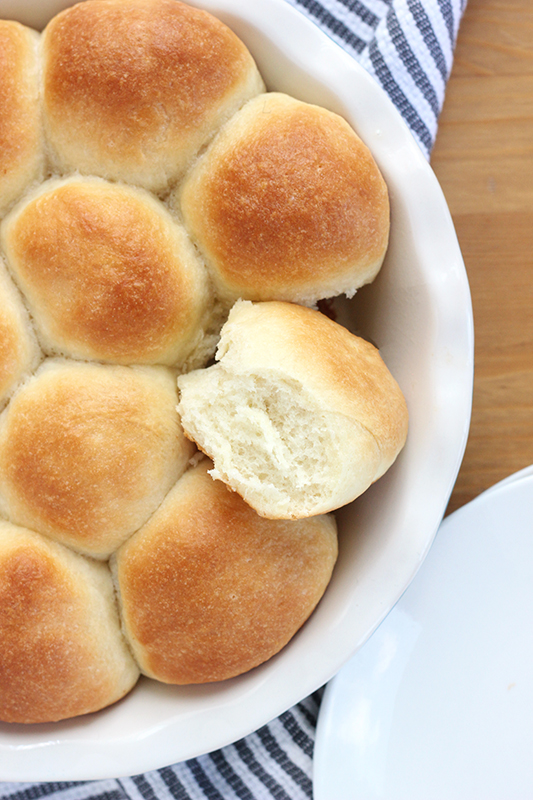
This simple artisan bread recipe has only four ingredients and rises overnight, no kneading required! Quick, easy, and delicious! The best part? It requires ZERO baking knowledge or skill. You cannot mess this recipe up.
Looking for something to up your bread making game? Try learning how to make sourdough bread!
Why you will love this Overnight Bread Recipe
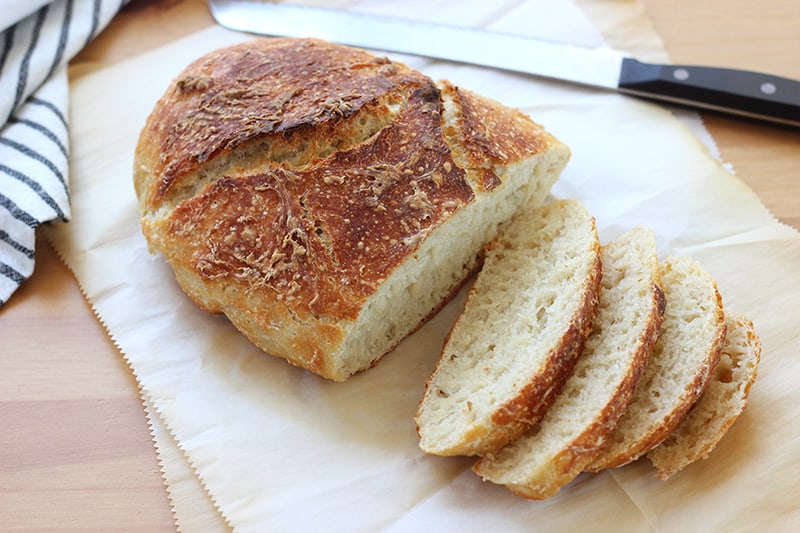
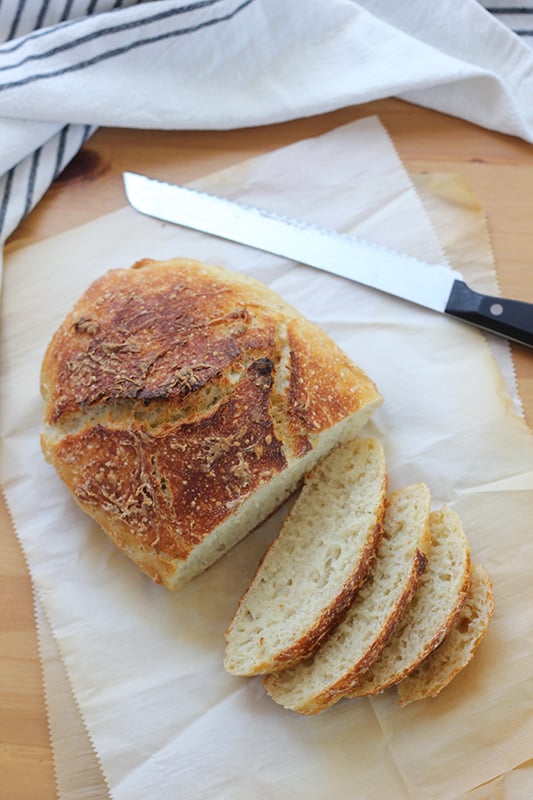
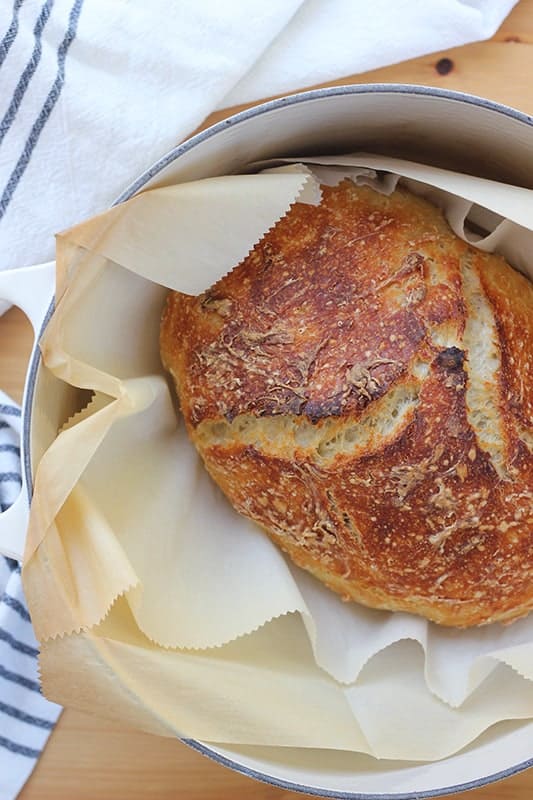
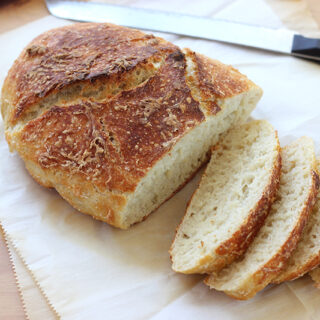
My neighbor popped over to door ditch us a loaf of bread. It was SO GOOD. Crisp on the outside, soft in the center, and perfect toasted with a slather of butter.
It was like the bread of my dreams. We enjoyed it so much that I asked for the recipe and my mind was blown. This has to be the easiest bread recipe I have ever made. And I have made dozens!
The secret? You let this bread rise overnight after gently mixing the ingredients by hand. No kneading, no mixer, and amazingly delicious end results. This easy artisan bread is has a beautiful crusty outside and soft center. I kid you not, this took me a whopping five minutes to prep. FIVE MINUTES!
Delicious served with slow cooker ham and potato soup or alongside rigatoni pasta!
What is No Knead Artisan Bread?
I have searched and searched to find a general definition of artisan bread. From what I found, artisan bread is bread that uses minimal ingredients and no additives. It has a crisp exterior, soft chewy center, and air pockets throughout the dough. It has a more rustic look and golden crispy outside.
No Knead Dutch Oven Bread ingredients
These are pantry staple ingredients, which means most of you should already have them on hand! Here is what you will need to make this easy bread recipe.
- All purpose flour- Also known as regular white flour. This is found in the baking aisle of your local grocery store.
- Yeast- For this recipe I like to use instant yeast. However, I have used active yeast with equally delicious results!
- Salt- A flavor enhancer that also helps work with the yeast.
- Water- Luke warm water is best. You don’t want it cold. I always suggest slightly warmer than room temperature.
Difference between active yeast and instant yeast:
Both yeast varieties help in the same way. With active yeast, you will need to let it proof in the water before you can move on to the next step. This helps to activate the yeast which in turn will help the bread rise. Instant yeast, on the other hand, goes straight into your dry ingredients. No proofing needed.
I tried to make these step by step instructions super easy, but please be sure to let me know if you have any questions. We have made this recipe dozens of times and I am always happy to help troubleshoot!
How to make No Knead Bread
- The night before you are ready to bake your bread, mix together the flour, yeast, and salt in a medium glass bowl. I use a wooden spoon or spatula.
- Fold in the water until the dough has formed. This should only take about a minute or two.
- Scrape the sides of the bowl and contain in the center of the dish.
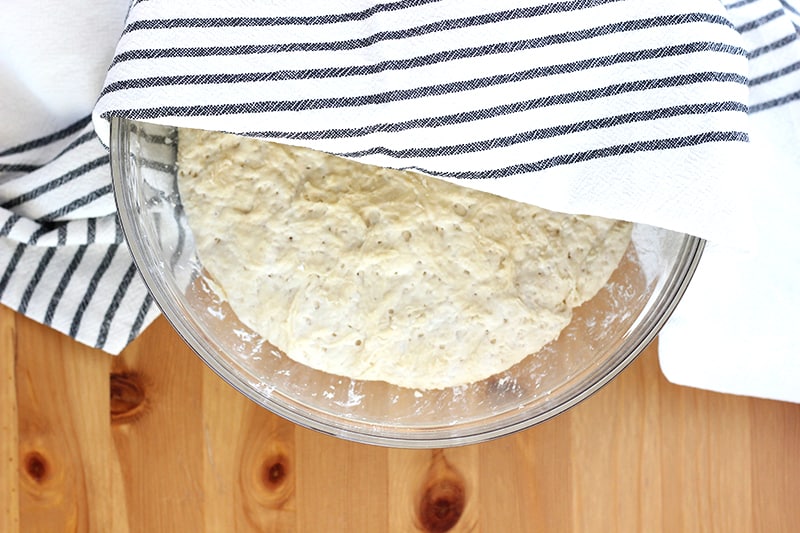
- Cover with plastic wrap, or a clean towel, and allow to rise for 12 to 18 hours in a warm dry place.
- The next morning, or after 12 to 18 hours, your dough should be double in size and dotted with air pockets or bubbles.
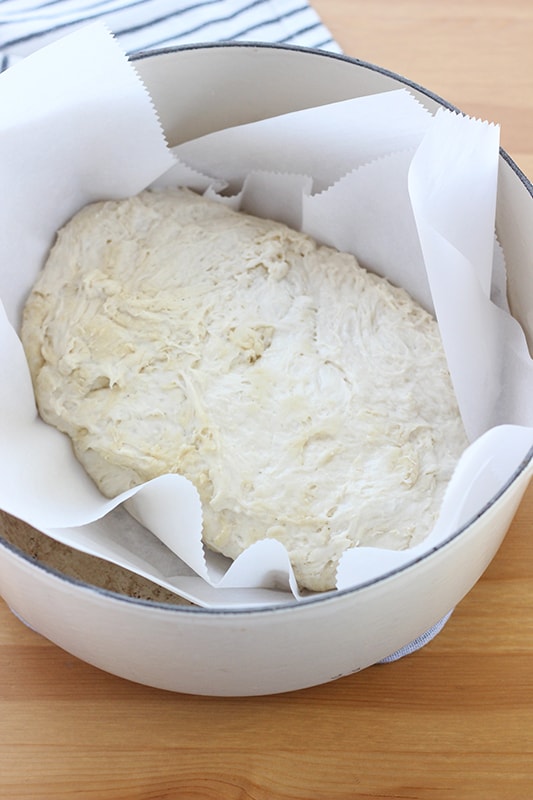
- Turn out onto a lightly floured piece of parchment. Fold the dough onto itself forming a ball. Let it rest for 30 minutes.
- Preheat your oven to 450 degrees. Place your dutch oven, with the lid, inside and heat for 30 minutes (the same as the dough rest time).
- Very carefully transfer the dough and parchment into your heated dutch oven.
- Cover and bake 30 minutes.
- Remove the lid and bake an additional 15 minutes.
- Cool slightly, slice, and serve.
Helpful Tools for Overnight No Knead Bread
The only item that is a MUST for this recipe is a cast iron dutch oven with a lid ($70 with prime 2 day shipping!). I highly recommend enamel coated. The key to getting that super crispy outside is when you heat up the pan, and it gets HOT. The cast iron is suited for those high temperatures and perfect size for your loaf.
Bonus, you will fall in love with this pot. It is one of my most used kitchen items. So easy to clean, even heating, and both stove top and oven safe.
No Knead Artisan Bread making tips
- This dough is sticky, and that is ok. Try to avoid adding any extra flour.
- When measuring your flour, be sure to spoon it into your measuring cup. Spooning makes sure the flour is not too compact and avoids adding too much flour to the dough.
- Bread flour can be substituted for the all-purpose flour in this recipe. I like to use a 1:1 ratio when substituting.
- Your dough should be dotted with air bubbles after it rises, this means it is ready to go into the oven.
- We have enjoyed adding in herbs like fresh garlic and rosemary or shredded cheese to the dough as well.
- This bread is insanely delicious toasted with a little spread of homemade pomegranate jelly or as the base to a good Chicken Salad Recipe.
How to serve Overnight Bread
This bread recipe is so great for so many things. Try it as the base to a sandwich, French toast, avocado toast, and even garlic toast!
If you’re looking to simply reheat and serve with butter, try baking the bread at 350 degrees for five to ten minutes. Check the bread periodically while it’s in the oven. You want it to be warmed through and slightly crispy on the outside, but not overly toasted or dried out.
How to store No Knead Dutch Oven Bread
By following these storage instructions, your no-knead bread should stay fresh for a few days at room temperature.
Allow the bread to cool completely after baking. Wrap tightly in plastic wrap and place into a resealable plastic bag, removing as much air as possible. Store in a cool dry place.
Overnight Bread Recipe FAQs
If your no-knead bread is turning out dense and heavy, there could be a few possible reasons:
Check the yeast expiration date. Using fresh yeast that has been activated properly is key to a light finish.
Under-baking can also cause the bread to be more dense. If the bread is removed from the oven before it is fully baked, it can result in a more dense and gummy texture.
If the dough is allowed to rise for too long, it may lose its structure and become deflated. This can result in a flat, dense, or misshapen final loaf.
Here are a few indicators to help you determine if the dough has risen sufficiently:
As the dough rises, it should take on a rounded, slightly domed shape. This indicates that the gluten has developed, and the dough is trapping the gas produced by the yeast.
As the dough rises, it should take on a rounded, slightly domed shape. This indicates that the gluten has developed, and the dough is trapping the gas produced by the yeast.
More Bread Recipes:
Want to save this recipe?
Enter your email below & we’ll send it to your inbox. Plus get great new recipes from us every week!
No Knead Dutch Oven Bread
Ingredients
- 3 cups flour (we like all-purpose or bread flour)
- 1/2 teaspoon instant yeast
- 1½ teaspoon salt
- 1½ cups luke warm water
Instructions
- The night before you are ready to bake your bread, mix together the flour, yeast, salt in a medium glass bowl. I use a wooden spoon or spatula.
- Fold in the water until the dough has formed. This should only take about a minute or two.
- Scrape the sides of the bowl and contain in the center of the dish.
- Cover with plastic wrap, or a clean towel, and allow to rise for 12 to 18 hours in a warm dry place.
- The next morning, or after 12 to 18 hours, your dough should be double in size and dotted with air pockets or bubbles.
- Turn out onto a lightly floured piece of parchment. Fold the dough onto itself forming a ball. Let it rest for 30 minutes.
- Preheat your oven to 450 degrees. Place your Dutch oven, with the lid, inside and heat for 30 minutes (the same as the dough rest time).
- Very carefully transfer the dough and parchment into your heated Dutch oven.
- Cover and bake 30 minutes.
- Remove the lid and bake an additional 15 minutes.
- Cool slightly, slice, and serve.
Notes
The nutrition facts provided are calculated using a third-party tool and are estimates only. Actual nutritional content may vary based on the ingredients and brands you use, as well as portion sizes. For accurate results, please consult a registered dietitian or nutritionist.
Pin for later:
Still hungry? Follow One Sweet Appetite on Facebook, Instagram and Pinterest for more great recipe ideas!


My family loved this bread. Best recipe ever
Thank you! It is one of my favorites for sure!
I can’t believe how easy it was to make! This was my first attempt at bread making The family loved it. Next up, rosemary bread.
Thank you for sharing this recipe with us!
Thank you, Teresa!
This recipe was not my favorite. I’m not sure why this dough had to be so wet and sticky. It was near impossible to shape into a ball. The dough just stuck to the parchment paper. I tried to be very gentle on adding more flour but it had the consistency of children’s slime. I measured by weight, used all bread flour and let proof for 18 hours. I’m not sure. I’ve definitely used easier recipes and I’m not a beginner. Just didn’t work for me. Baked fine straight into the DO. Did not use parchment paper to bake.
Thanks for the feedback, Sandy. I’ll see about adding a video into this recipe to maybe help others while making this recipe.
Baked the bread today for the 1st time. Love everything except it’s hard to slice even though the crust is not thick. I also have to mention, I am in dry climate, so for anyone in same situation I recommend covering overnight with plastic or top of dough dries up. I’ve also placed an empty cookie pan one row below to prevent scorched bread bottom. I wet the parchment paper and sprayed the top of bread with water – to create more steam. Also, I heated the oven 50 degrees more, so not so much heat is lost when placing bread into the pot.
Hi Anna, thank you so much for taking the time to review and rate this recipe and for leaving so many great tips! I can’t wait to try these out.
I have a combo oven with convection. Have you ever tried baking this bread using convection setting and if so how does it change the time?
Juanita
I don’t own a convection oven and won’t be able to offer any advice when baking. However, I did a quick google search and there are many websites that can help convert that temp and time for you.
Hi, I made the dough around 8am and it is now 3pm and the dough is ready, bubbles and doubled in size. 7 hours…😲 should I wait for allotted time or go for it.
Thank you
Carol
Hi Carol, I’d bake it.
This bread came out perfect, with a crispy crust and soft insides. I’ll certainly make it again. To make it a little healthier, I used half bread flour, half spelt flour, but I didn’t change anything else. Do you by any chance have this recipe with weight measurements? Measuring cup amounts with flour can be inconsistent.
Also, how do you keep your dough from spreading out in your Dutch oven? Maybe my dough was a little too soft, but as with other no-knead breads I’ve made in the past, it didn’t hold it’s shape very well after the 30 minute rest. I made my Dutch oven a little narrower by adding a ring of foil and setting the parchment paper inside the ring, but maybe there is a better way…?
Tried this recipe 3 times. The first time it was a success. Total disaster the next 2. Even bought new yeast and flour. Would not recommend due to inconsistent results.
Are you measuring the dry ingredients properly? I’d love to help troubleshoot this. I have made this recipe over 100 times without any issues.
Can I use wax paper instead of parchment paper?
No. Wax paper cannot go into the oven.
Hi Jan, I’d love to help figure this out. I replied on a previous comment. I’ve made this recipe over 100 times with no issues. Are you using a spoon to scoop the flour into the measuring cups and leveling off? The water should be warm, but not hot. Too hot and it will kill the yeast. Too cold and it won’t activate.
How can I make this in a regular oven? I don’t have a Dutch oven. do I put a pan of water on the bottom rack? same baking temp and time?
Hi Sarah. A dutch oven is a type of pan (https://amzn.to/3ZeJUFH), not the type of oven. It is an enamel coated cast iron pot. The only other suggestion would be a regular cast iron pot with a lid. I don’t think this recipe will turn out the same in a regular pan.
Thank you for asking this question.
Simple, easy and delicious. Perfect for a warm and toasty Saturday breakfast.
Jesseca, it seems that since you updated your page yesterday, the ‘sugar mention’ is gone. thank you!
You are welcome. I updated it last week when it was first mentioned. The sugar was not mentioned in the recipe ingredients but was a typo in the instructions. I fixed it the second it was brought to my attention.
I’m disappointed, I wanted to make the bread tonight, but the amount of sugar is still not on the recipe! You said you removed it, so what is it? Does it have sugar or not?
No. I’m looking right at the recipe card and no where on there is sugar mentioned. I’m not sure why there is still the issue.
You mention sugar in your bread recipe, but I found no where that it states how much sugar.
Did I miss it ? As it is not in the ingredients list.
Just Don
That was a typo, my apologies. It is fixed now.
@Jesseca, I can’t find it either…not fixed..
@María, I just looked through the recipe. I did remove the mention of sugar.