
Candy Strawberry Slices
This post may contain affiliate links.
Want to learn how to candy strawberries the easy way? These glossy candied strawberry slices are a simple upgrade for cupcakes, cakes, or even a sweet little snack. If you’re looking for a fun way to dress up your desserts, this is it.
These are perfect to snack on like candy or use as toppers to your favorite cakes and cupcakes!

Why You’ll Love This Recipe
- Cupcake and cake topping: These glossy slices add a beautiful, professional touch to homemade desserts.
- Homemade edible decorations: Skip store-bought and make your own sweet, sparkly fruit toppers.
- Kid-friendly snack: Naturally sweet and fun to eat—perfect for picky snackers or lunchbox treats.
If you’ve ever wanted to make your desserts look next-level without putting in hours of work, candied strawberries are the answer. With just three simple ingredients and a little oven time, you get sweet, glossy slices that taste as good as they look.
They’re perfect for topping cupcakes, garnishing cakes, or snacking straight off the tray. This recipe is easy enough for beginners but fancy enough to impress. No candy thermometer required.

Ingredients You’ll Need
You only need three simple ingredients to make these beautiful candied strawberry slices, but the results look like you spent way more time than you did.
- Strawberries: Fresh, firm berries work best. Look for ones that are ripe but not too soft so they hold their shape when sliced and candied.
- Granulated Sugar: White sugar is key for that classic clear candy coating. Don’t substitute with brown sugar. It’ll change the texture and color.
- Water: Use regular tap water to dissolve the sugar into a smooth syrup. Keep the ratio accurate to avoid gritty or runny results.
These basics come together to make something seriously impressive. Just a few minutes and you’ve got a stunning topping or sweet treat ready to go!

Jesseca’s Recipe Review
These candied strawberries are one of those “look fancy, zero effort” recipes I keep coming back to. They make cupcakes look bakery-worthy, and let’s be real. I’ve definitely snacked on a few straight from the tray. Sweet, glossy, and surprisingly easy to make. Totally worth the low-and-slow oven time.
Tip from Jesseca:
For picture-perfect slices, use a sharp knife or mandoline, and don’t skip the parchment paper. It saves you from a sticky mess later.

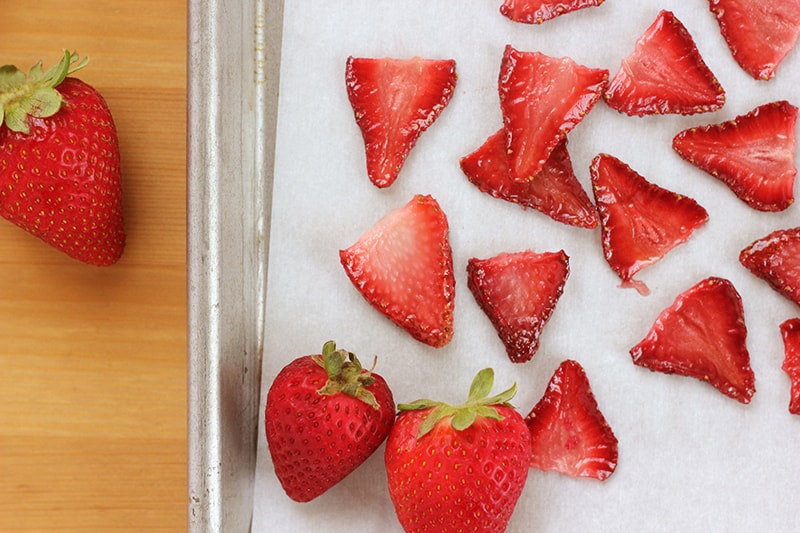
How To Make Candied Strawberries
This process is easier than you’d think! You’ll make a simple sugar syrup, dip thinly sliced strawberries, and bake them low and slow until they’re beautifully dried and glossy.
- Combine equal parts sugar and water in a saucepan and bring to a boil.
- Once the sugar is fully dissolved, remove from heat and let the syrup cool.
- Wash, hull, and thinly slice your strawberries.
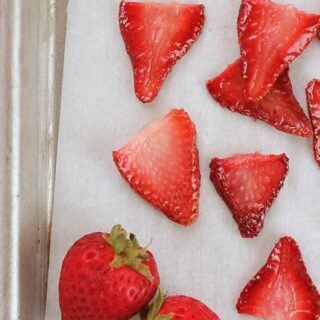
- Dip each slice in the cooled syrup, then lay them on a parchment-lined baking sheet.
- Bake at 200°F for up to 3 hours, checking every hour until the slices are dry but still vibrant red.
That’s it! A little patience and low heat is all it takes to make gorgeous, edible decorations or a sweet snack.


Storage and Make-Ahead Instructions
Candied strawberries can absolutely be made ahead—and they store surprisingly well when done right!
- To Store: Once the strawberries have fully cooled and dried, place them in an airtight container. Keep them at room temperature for up to 5–7 days. If your kitchen is humid, add a piece of parchment paper between layers to help prevent sticking.
- Avoid the fridge! Refrigeration adds moisture and can cause your slices to get sticky or soggy.
- To Make Ahead: You can prepare the sugar syrup up to 2 days in advance. Just keep it in a sealed jar at room temp. Slice and candy your berries the day before you need them so they have time to fully dry and cool.
Perfect for topping cupcakes, garnishing drinks, or snacking straight from the jar—these are a make-ahead win!

Recipe FAQs
Not recommended. Frozen strawberries release too much water when thawed, making them difficult to slice and candy properly.
They likely didn’t bake long enough or didn’t cool fully before storing. Try baking a bit longer next time and make sure they’re completely dry to the touch before putting them in a container.
Yes, for the classic clear candy coating. Brown sugar or powdered sugar will change the texture and color.
Yes! After dipping in syrup, place slices in the dehydrator at 135°F for 4–6 hours, or until dry but still vibrant in color.
The thinner, the better—around ⅛ inch thick is ideal. This helps them dry evenly and get that crisp candy texture.
Want to save this recipe?
Enter your email below & we’ll send it to your inbox. Plus get great new recipes from us every week!
How to Candy Strawberries
Ingredients
- 1/2 cup water
- 1/2 cup sugar
- 1 pint strawberries
Instructions
- In a small saucepan, combine ½ cup granulated sugar with ½ cup water. Stir and bring the mixture to a boil over medium heat. Once the sugar has fully dissolved (the syrup will look clear), remove the pan from heat. Let it cool to room temperature—this is important so it doesn’t cook the strawberries when dipped.
- Rinse your strawberries well, then remove the green tops (hull them). Using a sharp knife, slice each berry as thinly as possible—about ⅛ inch thick is ideal. Thinner slices dry more evenly and get that perfect candy texture.
- Once the syrup has cooled, dip each strawberry slice into the syrup, making sure it’s fully coated. Let any excess drip off before placing it onto a parchment-lined baking sheet.
- Bake the dipped strawberries in a 200°F (93°C) oven for up to 3 hours. Check on them every hour to monitor progress. You’re looking for slices that are dry to the touch but still have a nice red color—not browned or crisp.
- Let the candied strawberries cool completely on the baking sheet before peeling them off. Store in an airtight container at room temp for up to a week.
Nutrition
The nutrition facts provided are calculated using a third-party tool and are estimates only. Actual nutritional content may vary based on the ingredients and brands you use, as well as portion sizes. For accurate results, please consult a registered dietitian or nutritionist.


Hi, mine turned out more like dehydrated strawberries with a thin sugar coating.
How do I fix that? Do I need to thicken the sugar mixture more?
Hi Ashley, if you want more of a sugar coating I suggest doing what you suggested and thicken the coating. I’d also bake less than the called for three hours. Check them about an hour in and then every 30 minutes after and pull them out when they look good to you.
I followed the directions, did exactly what they said. Took about 4 1/2 hours in my oven and they don’t look anything like the photo. And they are not good. A waste of money, time and electricity! I was hoping for something fantastic, this was not. Sorry.
Hi paula. I am so sorry this recipe did not turn out for you. Please let me know if you’d like me to help troubleshoot what went wrong.
What should I do different if I wanted to candy whole strawberries?
Great question. I have never candied whole strawberries, but I do have a friend who has. Here is a link to her tutorial.
This looks great. Plan to use these to decorate my Strawberry Tiramisu with wild strawberry liqueur. I’m sure it will be a hit.
Thanks for the step by step.
My pleasure. Thank you for taking the time to comment!
Making these now
They looked so amazing I had to try them
Yum! Have you done this with raspberries or any other fruit?
This looks amazing! Would these same steps work for other berries too, such as raspberries? Thanks!
I’ve never tried them with other berries but I would think it would work.
I ove this idea. I play Bunco, once a month with some lady friends and this would be a great snack. I saw some deviled strawberries using Nutella as the filling. I am going to make the candied ones and serve with Nutella on the side as a dip.
I loooooove the idea of using nutella as a dip!
Hello there! Thanks for sharing such an awesome and simple recipe!!! I shall be trying to make these to top my Dad’s birthday cake 🙂
Be sure to let me know how they turn out!
Yumm! Those look delicious! Thanks for linking them up at Monday Funday!
What a great idea! Love this 🙂
I have to try this I never would have thought to do this
These look delicious. What a perfect valentines day recipe! My husband isn’t a big lover of chocolate so this recipe should certainly do the trick.
Strawberries are a favorite at our house. This would be a fun new idea for us! Thanks!
Yum! Can’t wait to make some, I bet my girls would love these!
What a fun idea! I can’t wait to see what you do with them!
That’s a brilliant idea, definitely saving and pinning!
Mmmm! They look delicious. I think my kids would love them too. Pinning!
mmm these look delicious! How long do you think they store?
Maybe a couple days at most. I would keep them in an air tight container out on the counter.
Wow! these look absolutely amazing. I would never have thought to candy strawberries, but now I am craving them.
Ooooh! Well this is fun 🙂 I’ve never heard of candied strawberries. Love the step-by-step. I feel like a stalker.. hope you don’t mind me coming to visit and commenting on every post – just love your site!!
stalk away! I love comments!