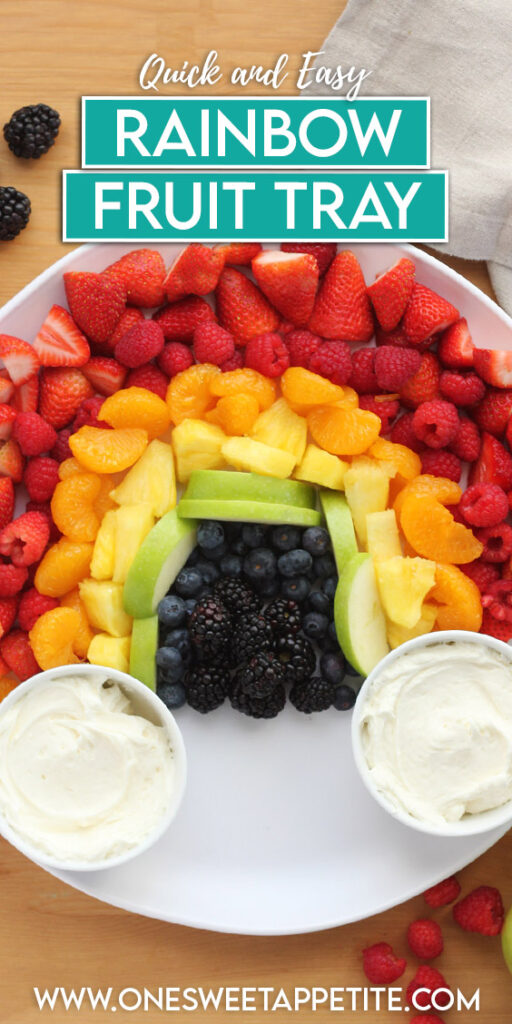
Rainbow Fruit Tray
This post may contain affiliate links.
This super simple Rainbow Fruit Platter is the perfect treat for all ages. Made with fresh fruit and served with a side of fluffy fruit dip. Customizable and an easy way to want to eat more fruit.
Try serving this simple fruit salad with Coconut Whipped cream, Mango Popsicles, or my cheesecake 2 Ingredient Fruit Dip!
Why You’ll Love This Recipe
- Easy: If you can wash fruit, you can make this fruit platter. So simple and most can be prepared in advance!
- Cheaper than Store Bought: If you find fruit on sale, you can save almost half of the cost of a premade tray! This tray that is photo’d lasted an entire week!
- Make it Mini: No need to go big. If you want a single serve version just scale down! We make these every summer on a weekly basis.
I LOVE this idea. Is it mine? No. I started doing this almost 14 years ago for St Patrick’s day for my kid after seeing a friend post to Facebook. He looks forward to his morning fruit spread every year, and we have even opted to serve this in mini form year round. Anytime we’re in the mood for a beautiful serving of fruit, we bust out the rainbow display!
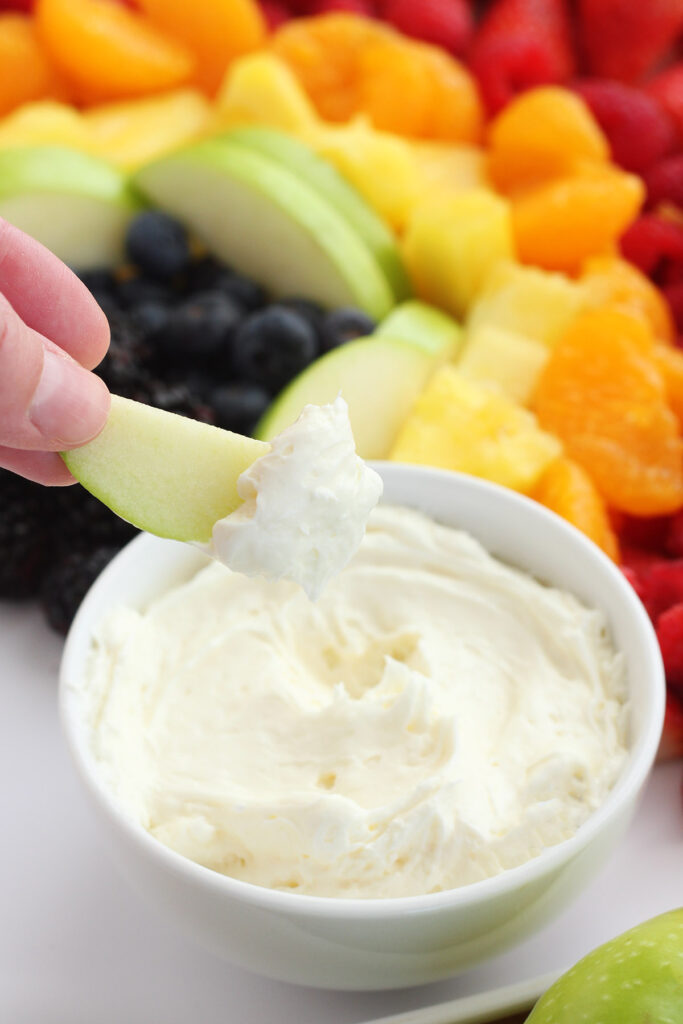
Now, fruit is delicious all on its own. But you know what sends rainbow fruit over the top? Marshmallow fruit dip. Long lasting and tastes like cheesecake, you just can’t go wrong!
Ingredients You’ll Need
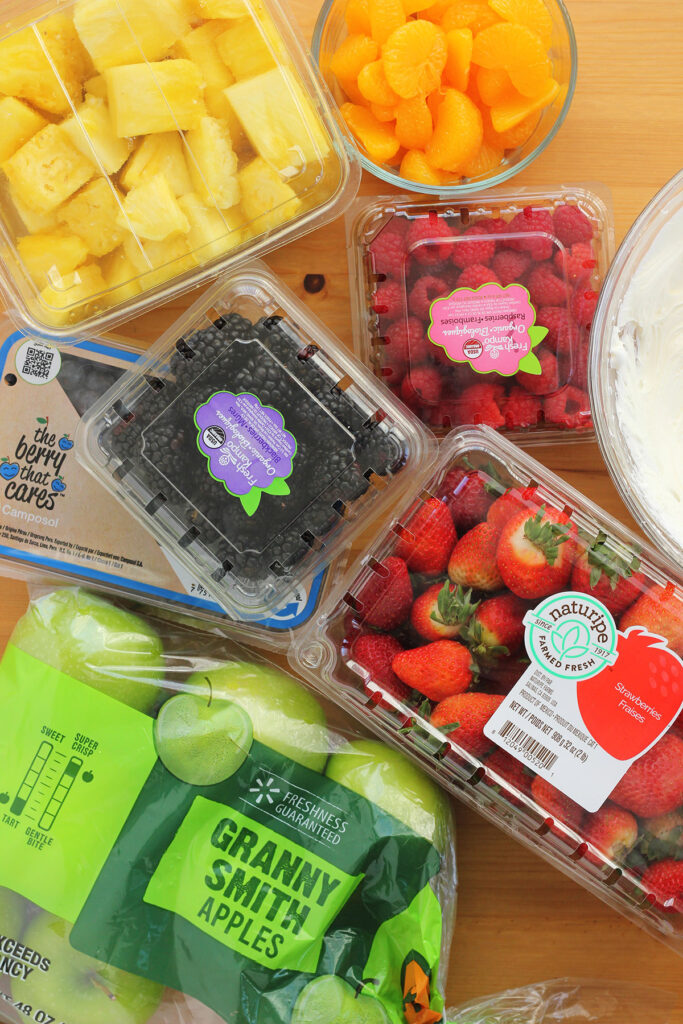
Here’s the beauty of this fruit platter recipe. You can follow how I made it OR you can use whatever fruits your family loves. I put together a list of options that will help you build the perfect board.
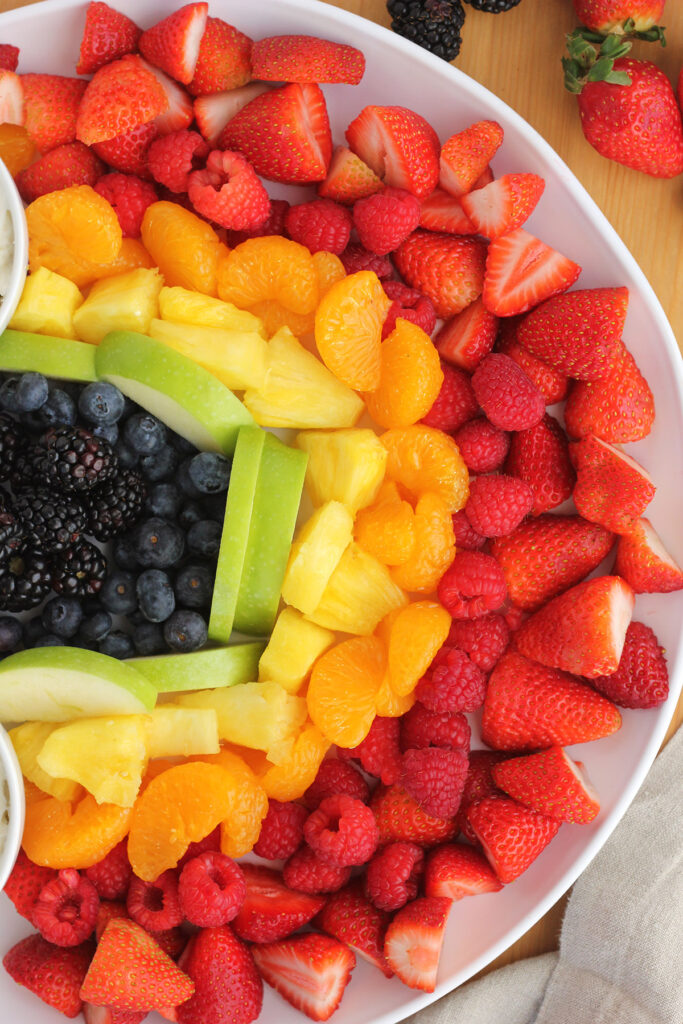
- Red: Strawberries, cherries, raspberries, red apples, pomegranate seeds or watermelon
- Orange: Oranges (I used mandarin), apricots, cantaloupe or mangos
- Yellow: Pineapple, banana, mango or golden delicious apples
- Green: Apples, grapes, honeydew or kiwi
- Blue: Blueberries are king here. You can also opt for concord grapes
- Purple: Blackberries, grapes, or plums

Jesseca’s Recipe Review
This looks impressive, takes minimal effort, and is always the first thing to disappear. The dip? Ridiculously simple but somehow makes people think you whipped it up from scratch. I’ve brought this to brunches, potlucks, and even used it as a last-minute birthday centerpiece. It always works.
Tip from Jesseca:
Use a round platter and start your rainbow in a spiral. It gives that extra wow factor with almost zero extra work. And don’t skip the orange zest in the dip. It’s the secret that makes it taste like sunshine.
Variations and Substitutions
This fruit tray is super flexible, so feel free to mix things up based on what’s in season, on sale, or already in your fridge.
- Red: Swap strawberries or raspberries with red grapes or watermelon.
- Orange: Mandarin slices or cantaloupe are great stand-ins.
- Yellow: Try mango or banana slices if pineapple isn’t your thing.
- Green: Kiwi, green grapes, or honeydew melon work well in place of apples.
- Blue/Purple: Can’t find blueberries or blackberries? Use purple grapes or pitted cherries instead.
This tray is all about the vibe. Colorful, fresh, and fun. Don’t overthink it. If it tastes good and adds color, it belongs.
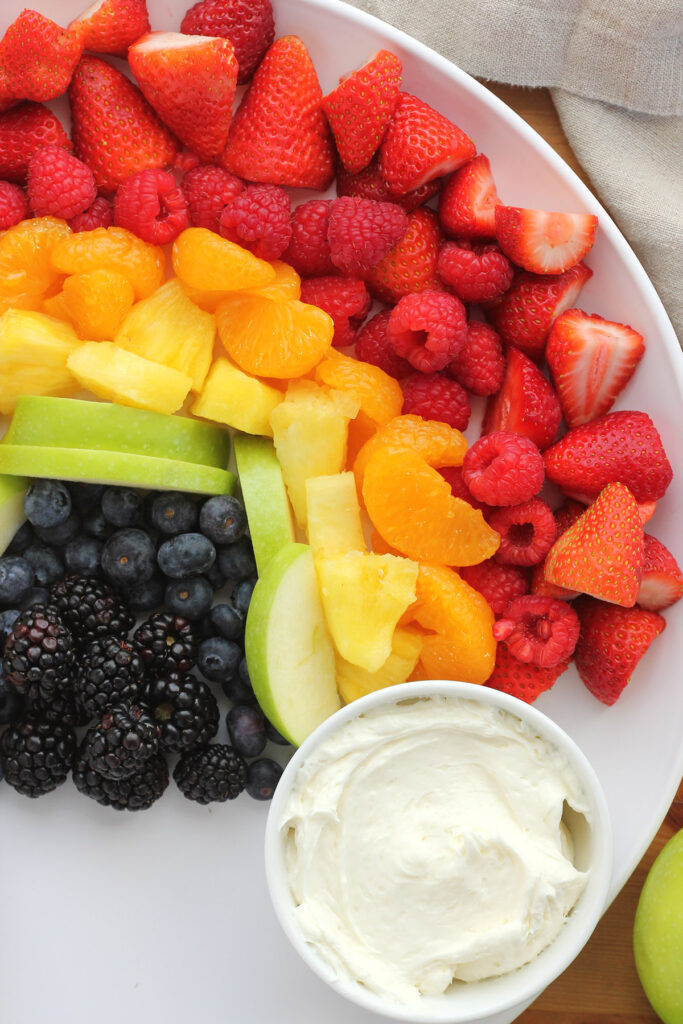
How To Build A Fruit Tray
This colorful fruit tray comes together in minutes and looks like a total showstopper. Here’s a quick peek at how it’s done:
- Wash and prep fruit. Rinse everything well and dry completely. Slice or peel any fruits that need it.
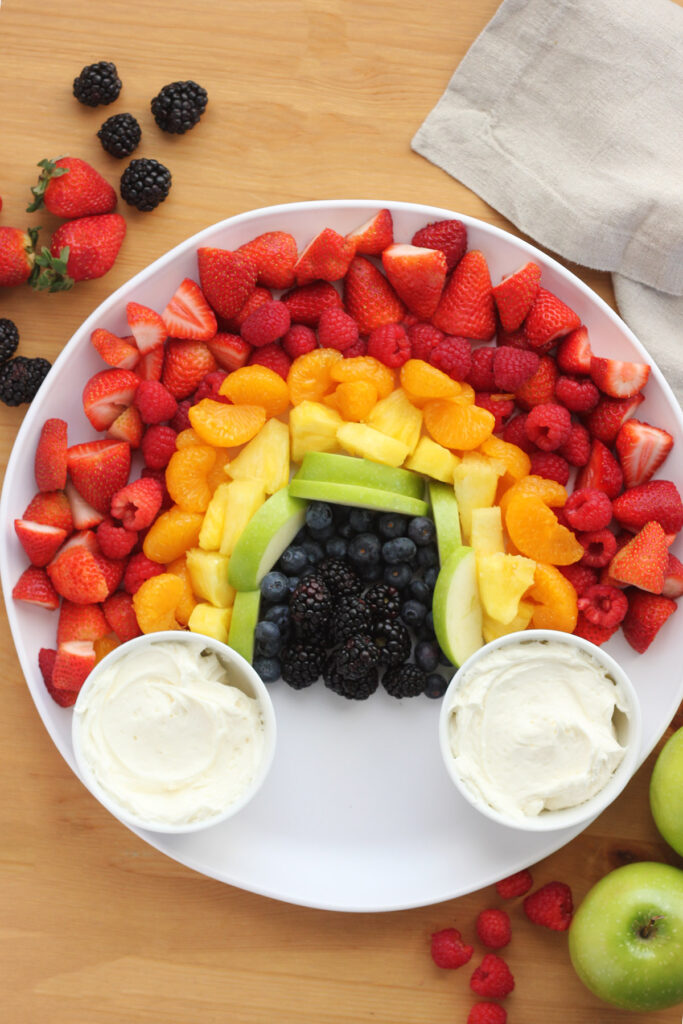
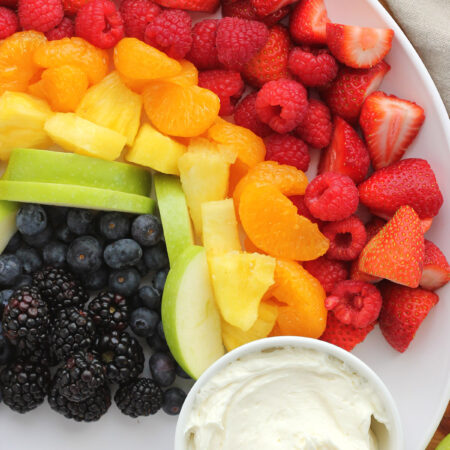
- Arrange in rainbow order. Start at the outer edge of your platter and work inward using this color pattern: red, orange, yellow, green, blue, purple.
- Make the fruit dip. Beat together the marshmallow fluff, cream cheese, orange zest, and vanilla until fluffy and smooth.
- Serve it up. Spoon the dip into small bowls and nestle them onto the tray for easy dipping.
That’s it! Perfect for parties, brunches, or just a fun way to eat more fruit.
Helpful Tools
- White Serving Tray: I like my white round serving platter (affiliate) and use it for so many things. That being said, this separated tray (affiliate) would also be awesome!
- Hand Mixer: Can you stir this by hand? Yes, but it is so much easier to use a stand or hand mixer (affiliate). It helps everything to come together in minutes and mixes it perfectly.
- Silicone Spatulas: If I can only recommend one kitchen tool, it would be a set of silicone spatulas (affiliate). These are so versatile and used daily in our kitchen. Great for baking AND cooking.
Recipe FAQs
Yes! Prep the fruit the night before, store each color in separate containers in the fridge, and assemble the tray just before serving. This keeps everything crisp and fresh.
A quick toss in lemon juice will help prevent browning, especially for apples and bananas. It adds a subtle tartness and keeps your tray looking vibrant.
Not recommended. Frozen fruit gets mushy when it thaws and won’t hold up well on a tray. Stick to fresh for the best texture and color.
Plan for about ½ to 1 cup of fruit per person, depending on how many other snacks you’re serving. You can easily scale this tray up or down.
Totally. If you can’t find every color of the rainbow, just use what’s in season or what you love. The goal is vibrant and fun, not perfection.
Storage and Make-Ahead Instructions
This fruit salad is easy to prep ahead. A little planning keeps everything fresh and crisp.
- To Make Ahead: Wash, dry, and cut the fruit up to 1 day in advance. Store each color in separate airtight containers in the fridge to prevent flavors from mixing and fruit from getting soggy. Assemble the tray right before serving for the best look and texture.
- Fruit Dip: You can make the dip up to 3 days ahead. Store it in an airtight container in the fridge. Give it a quick stir (or re-whip) before serving to fluff it back up.
- Leftovers: Store any leftover fruit in individual airtight containers in the fridge for up to 3 days, depending on the fruit. Leftover dip will keep for up to 5 days, but it’s best within the first few.
Pro tip: If you’re using apples or bananas, toss them in a little lemon juice to help prevent browning if prepping ahead.
Want to save this recipe?
Enter your email below & we’ll send it to your inbox. Plus get great new recipes from us every week!
Rainbow Fruit Platter
Ingredients
For the Fruit Tray
- Strawberries
- Raspberries
- Oranges
- Pineapple
- Green apples
- Blueberries
- Blackberries
For the Fruit Dip
- 1 (8oz) cream cheese (softened)
- 1 (7oz) marshmallow fluff
- 1 teaspoon vanilla extract
- zest of 1 orange
Instructions
- Wash and dry the fruit you plan to use. Cut any fruits that need the peel removed.
- Arrange the fruit on the serving platter, starting on the outer edge, in the following color order: red, orange, yellow, green, blue, purple.
Fruit Dip
- Make the dip by combining the marshmallow fluff, softened cream cheese, orange zest, and vanilla extract into a mixing bowl.
- Whip for 1 to 2 minutes, or until combined and fluffy.
- Transfer to serving bowls and add to the serving plate.
Notes
The nutrition facts provided are calculated using a third-party tool and are estimates only. Actual nutritional content may vary based on the ingredients and brands you use, as well as portion sizes. For accurate results, please consult a registered dietitian or nutritionist.