
Ranch Chicken
This post may contain affiliate links.
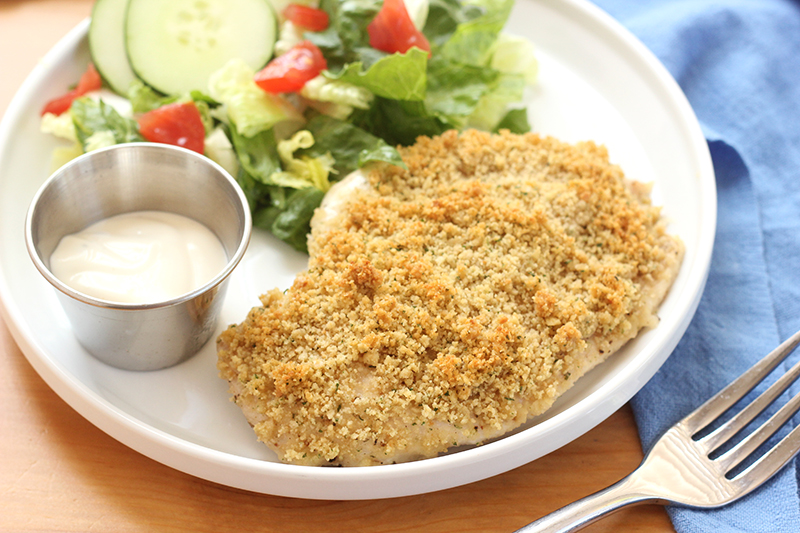
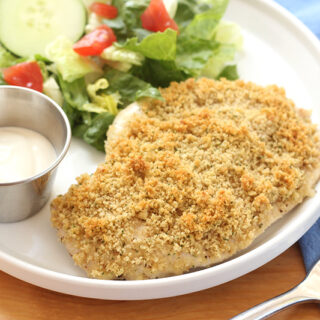
This baked ranch chicken is crispy on the outside, juicy on the inside, and loaded with bold ranch flavor. With only a few simple ingredients, you can have dinner on the table in 30 minutes. The secret?
Creamy ranch dressing and buttery breadcrumbs that bake into a golden, flavorful crust. Whether you call it Hidden Valley ranch chicken, ranch dressing chicken, or simply the best ranch chicken breast recipe, this one is guaranteed to be a family favorite.
Searching for more delicious chicken dinners? I’ve got you! Be sure to try my Easy Teriyaki Chicken!
Why You’ll Love This Crispy Baked Chicken
- Easy ingredients: Just chicken breasts, ranch dressing, and breadcrumbs — no fancy prep required.
- Quick to make: Dinner is ready in about 30 minutes, perfect for busy weeknights.
- Crispy and juicy: Baking instead of frying gives you a crunchy coating without the grease.
- Versatile: Serve it with potatoes, rice, or a side salad for a complete meal.
- Kid-approved: The mild, savory ranch flavor makes this a hit with even picky eaters.
This ranch chicken recipe has been a weeknight staple in my kitchen for years. It started as a “what can I make fast?” dinner idea and turned into one of my most requested 30 minute dinner recipes. The creamy tang of ranch paired with the buttery crunch of baked breadcrumbs checks every comfort food box.
If you love simple chicken dinners like this, you’ll also enjoy my Chicken Parmesan Bake, Grilled Chicken Breast, and Chicken Cordon Bleu. Each one uses pantry ingredients and is easy enough for a weeknight while still tasting like you spent hours cooking.

Before You Start Cooking
You only need a few simple ingredients to make this baked ranch chicken recipe. Each one helps create juicy chicken with a flavorful, crispy topping.
- Chicken breasts: Boneless, skinless chicken breasts work best. Slice them in half or pound to about ½ inch thick so they cook evenly and stay tender. You can also use boneless thighs for a slightly richer flavor.
- Salt, pepper, and garlic powder: These basic seasonings build the foundation of flavor. Salt enhances the taste, pepper adds a hint of spice, and garlic powder gives a mild savory depth that pairs perfectly with ranch.
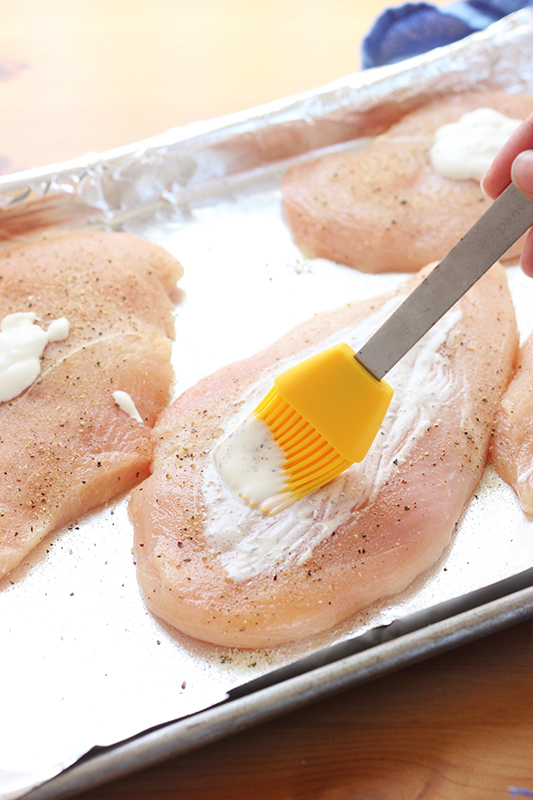
- Ranch dressing: This is what gives the chicken its signature flavor. Hidden Valley Ranch provides that classic tangy and herby taste, but any ranch dressing will work. It also helps the breadcrumbs stick to the chicken and keeps it moist while baking.
- Breadcrumbs: These create the crispy texture everyone loves. Panko breadcrumbs give a light, airy crunch, while Italian-style adds extra seasoning like oregano and basil. Both are great choices depending on how much flavor you want in the coating.
- Butter: Melted butter adds richness and helps the breadcrumb topping brown evenly in the oven. You can substitute it with a light spray of olive or avocado oil if you want to cut back on fat.
Everything in this list is easy to find and budget-friendly, which makes this recipe a true weeknight staple. Once baked, you’ll have tender, juicy chicken with a golden breadcrumb crust and that classic ranch flavor in every bite. Serve with veggies for the perfect meal.

Jesseca’s Recipe Review
This ranch chicken breast has been one of my go-to weeknight dinners for years. It’s fast, foolproof, and delivers the perfect balance of creamy ranch flavor with only 5 ingredients. My family never complains when it’s on the menu, and it’s one of the few meals I can count on everyone finishing without leftovers.
Tip from Jesseca:
For the best crunch, let the chicken rest for 3 to 5 minutes after baking. This helps the juices settle and keeps the coating crisp instead of soggy. If you like extra crunch, switch to panko breadcrumbs and give them a quick mist of oil before baking.
Variations and Substitutions
One of the best parts about this ranch chicken recipe is how flexible it is. You can easily swap ingredients or change the cooking method to fit your preferences or what you already have on hand.
- Different cuts of chicken: If you don’t have chicken breasts, boneless thighs are a great option. They stay juicy and flavorful, even if slightly overcooked. You may need to add a few extra minutes to the bake time.
- Ranch options: Hidden Valley Ranch gives that classic flavor, but any bottled ranch dressing will work. You can also use homemade ranch dressing or a ranch seasoning mix blended with a few tablespoons of mayonnaise or sour cream for a thicker coating.
- Breadcrumb swaps:Try panko breadcrumbs for extra crunch or use crushed crackers, cornflakes, or Ritz for more texture. Gluten-free breadcrumbs or crushed gluten-free crackers also work perfectly.
- Add a little heat: Mix a pinch of cayenne pepper, chili powder, or hot sauce into the ranch dressing before brushing it on for a spicy twist.
Simple adjustments like these let you make this baked ranch chicken your own while keeping that same delicious ranch flavor everyone loves.
Cooking Methods
This is one of our top recipes that turns out delicious whether you bake it, air fry it, or cook it on the stovetop.
- Oven-Baked: Bake at 425°F for 15 to 20 minutes, or until the internal temperature reaches 165°F. This gives you juicy chicken with a perfectly golden, crispy topping.
- Air Fryer: Cook at 400°F for 12 to 14 minutes, flipping halfway through. The air fryer makes the coating extra crunchy without drying out the chicken. Make sure to check your manufacturer’s instructions for the best results.
- Stovetop: Heat a skillet over medium heat and cook for 4 to 5 minutes per side, until golden and cooked through. Great for small batches or quick meal prep.
Each method creates tender, flavorful ranch chicken, so choose the one that fits your time and tools.
Helpful Tools
- Meat Thermometer: The MVP of ensuring your chicken is perfectly cooked. It’s like a trusty sidekick, telling you when the chicken is just right – safe, juicy, and never dry.
- Roasting Pan or Baking Dish: Your chicken’s stage for its oven performance. A good pan ensures even cooking and can handle all the delicious juices.
- Aluminum Foil or Parchment Paper: For lining your pan. It’s like the shield protecting your pan from sticky situations and making cleanup a snap.
- Tongs: For flipping and moving the chicken without piercing it (because we don’t want those precious juices escaping).


Let’s Talk Baked Ranch Chicken
Yes! Mix one tablespoon of dry ranch seasoning with ¼ cup of mayonnaise or sour cream. It creates the same creamy coating and sticks to the chicken just as well.
Use a meat thermometer and check the thickest part of the chicken. It’s done when it reaches 165°F. If you don’t have one, cut into the center — the juices should run clear, not pink.
Warm leftovers in the oven at 350°F for 10 minutes or in the air fryer at 375°F for 5 minutes to help the coating stay crisp. Avoid microwaving for too long or the breading can get soggy.
Yes. Boneless chicken thighs, tenders, or even drumsticks all work. You may need to adjust the cook time slightly — thighs take a few minutes longer, while tenders cook faster.
Use panko breadcrumbs and give them a light mist of cooking spray before baking. You can also broil the chicken for 1–2 minutes at the end for a golden, crunchy finish.
Storage and Make-Ahead Instructions
This ranch chicken recipe is perfect for busy nights because it’s easy to prep ahead and keeps well for leftovers. Here’s how to store and reheat it so it stays flavorful and crisp.
- Make Ahead: Prepare the chicken up to the breadcrumb step, then cover tightly and refrigerate for up to 24 hours before baking. When you’re ready to cook, add a few extra minutes to the bake time since the chicken will be cold from the fridge.
- Refrigerate: Store cooked chicken in an airtight container for up to 3 days. The coating may soften a bit, but it will crisp back up when reheated properly.
- Reheat: Warm leftovers in the oven at 350°F for about 10 minutes, or in the air fryer at 375°F for 5 minutes. This helps restore the crispy coating without drying out the chicken. The microwave works in a pinch, but the breading will be softer.
- Freeze: Cool the chicken completely, then wrap each piece tightly in plastic wrap and store in a freezer-safe bag for up to 2 months. Thaw overnight in the refrigerator before reheating.
With a little prep, this baked ranch chicken is just as good the next day. Making it a great option for meal prep, quick lunches, or stress-free weeknight dinners.
Want to save this recipe?
Enter your email below & we’ll send it to your inbox. Plus get great new recipes from us every week!
Baked Ranch Chicken
Ingredients
- 4 chicken breast halves
- 1/2 teaspoon salt
- 1/2 teaspoon garlic powder
- 1/4 teaspoon pepper
- 1/4 cup ranch dressing
- 1/2 cup breadcrumbs
- 3 tablespoons butter (melted)
Instructions
- Preheat the oven to 425°F (220°C) and lightly grease a baking dish or sheet pan with cooking spray.
- Place each chicken breast between two pieces of plastic wrap or inside a zip-top bag. Gently pound with a meat mallet or rolling pin until about ½ inch thick so they cook evenly.
- Place the chicken on the prepared pan. Sprinkle both sides with salt, pepper, and garlic powder.
- Brush about one tablespoon of ranch dressing over the top of each chicken breast. This helps the breadcrumbs stick and adds flavor.
- In a small bowl, mix the breadcrumbs and melted butter together until combined. Spoon the mixture evenly over the top of each piece of chicken.
- Bake for 15 to 20 minutes, or until the chicken reaches an internal temperature of 165°F and the breadcrumb topping is golden brown.
- Let the chicken rest for a few minutes before serving. This keeps it juicy and helps the crust stay crisp. Drizzle with extra ranch dressing if you’d like and serve with a favorite side such as roasted green beans or mashed potatoes.
Notes
- Use a meat thermometer to make sure your chicken is fully cooked but still juicy.
- If you like a crunchier crust, broil the chicken for 1–2 minutes at the end of baking.
- You can also make this recipe in an air fryer at 400°F for 12–14
Nutrition
The nutrition facts provided are calculated using a third-party tool and are estimates only. Actual nutritional content may vary based on the ingredients and brands you use, as well as portion sizes. For accurate results, please consult a registered dietitian or nutritionist.


This chicken was juicy and delicious. I did mix the Ranch dressing with some mayonnaise to make it thicker so it would stick to the chicken better. I also used Italian bread crumbs so no need for the spices. Pinned it to my Tried and True Pinterest board so I will not forget it.
This ranch chicken was super easy to make and it was delicious. I used boneless thighs. They cooked in 15 minutes. They were yummy and crunchy. Thanks.