
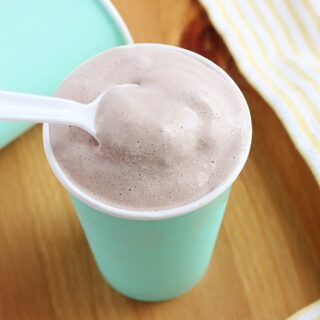
Wendy’s Frosty
This post may contain affiliate links.
If you’ve ever found yourself dipping fries into a Wendy’s Frosty and wondering, Could life get any better?—good news, it can! Making your own Frosty at home is ridiculously easy, and dare I say, even better than the drive-thru. No long lines, no melty mess on the way home—just pure, creamy, chocolatey bliss whenever the craving hits. Let’s whip up some magic!
Looking for more fun ways to cool down? Try my 7-Eleven Copycat Slurpee, Starbucks Strawberry Frappuccino Recipe, Harry Potter Frozen Butterbeer, and Copycat Chick-Fil-A Frosted Lemonade!
Why You’ll Love This Recipe
- Easy dessert recipe: Simple ingredients and quick to make.
- Copycat restaurant recipe: Tastes just like the real thing at home.
- Kid-friendly dessert: A treat the whole family will love.
- Budget-friendly treat: Cheaper than store-bought options.
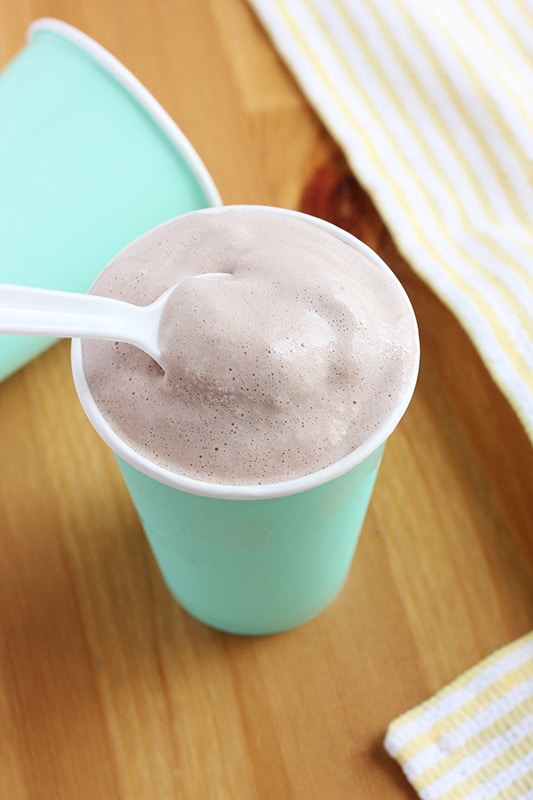
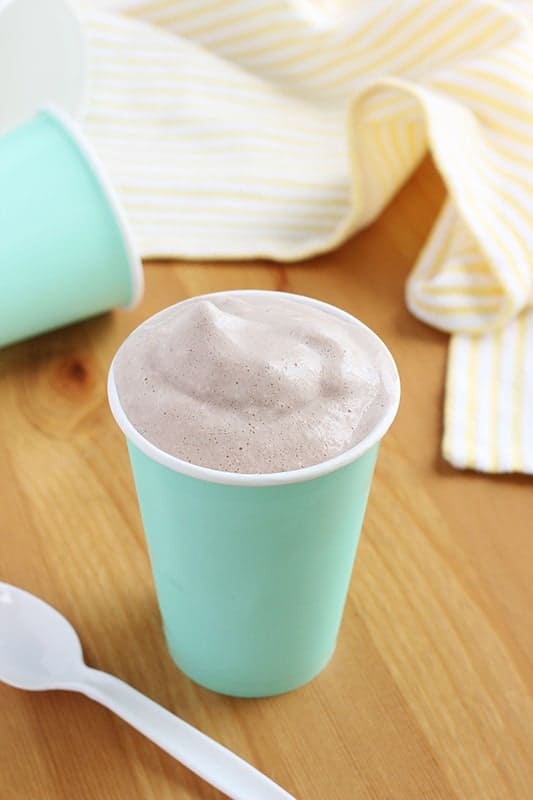
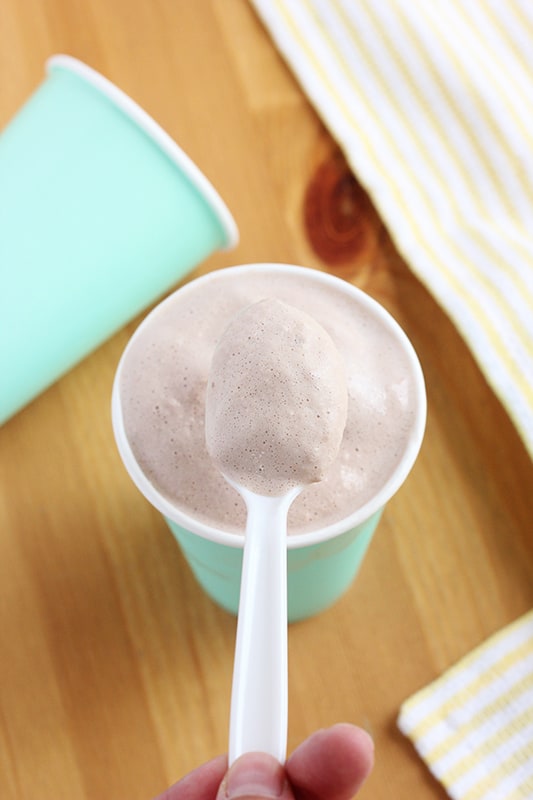
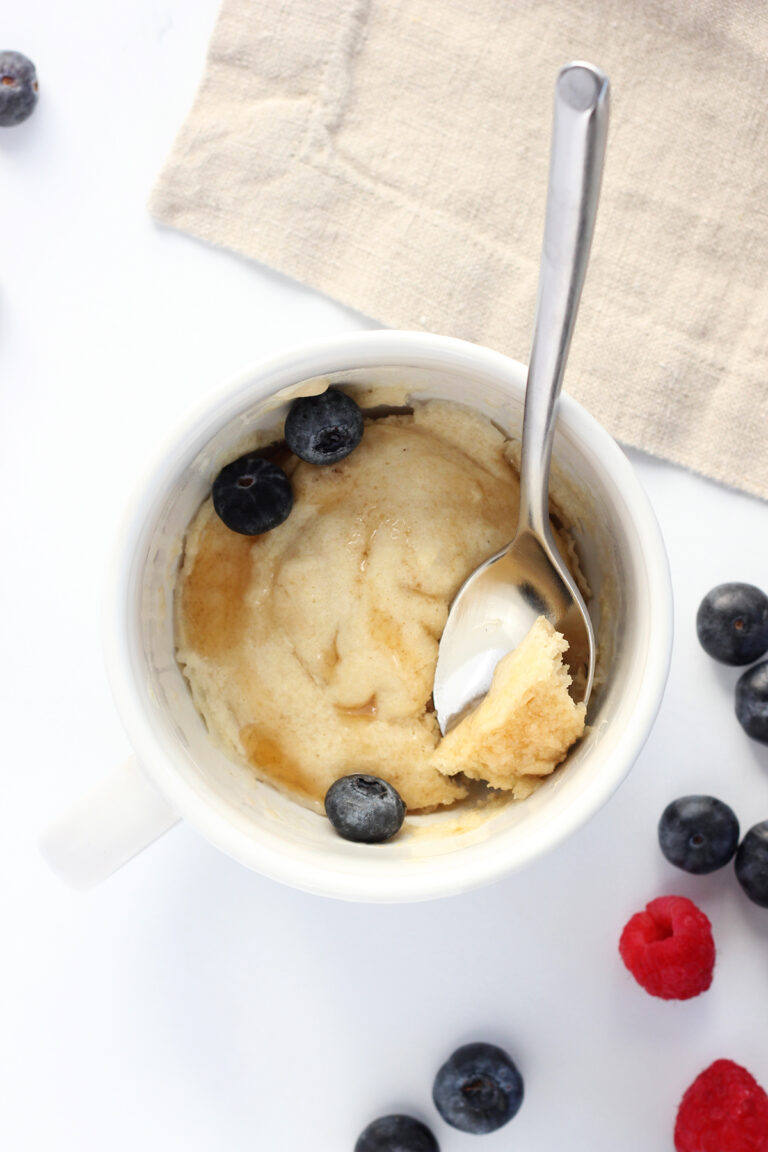
If you’ve ever craved that classic, creamy Frosty from the drive-thru, you’re in luck—this homemade version tastes exactly like the original! It’s thick, chocolatey, and ridiculously easy to make with just three simple ingredients. Over 75 people have tried and loved this recipe, so you know it’s a winner.
Whether you use an ice cream maker for the smoothest texture or go with the freeze-and-whisk method, you’ll end up with a perfectly scoopable, dreamy dessert. It’s the ultimate sweet treat for any occasion—no long lines required!
Ingredients You’ll Need
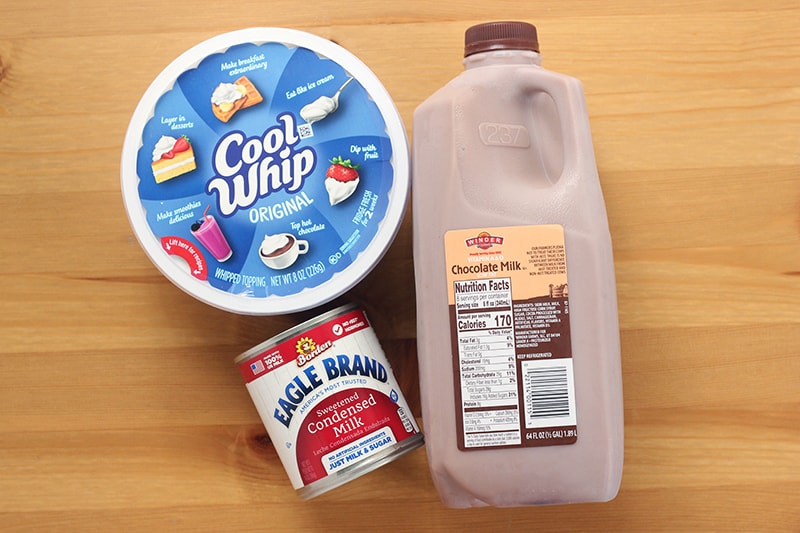
With just three simple ingredients for frosty, you’re minutes away from a creamy, chocolatey delight. Each one plays a key role in creating a rich, smooth texture that’s impossible to resist. Here’s the wendy’s frosty ingredients you’ll need:
- Chocolate Milk – The base of this recipe! Use your favorite brand, or for an extra indulgent twist, try a chocolate protein shake for a richer texture.
- Sweetened Condensed Milk – This adds silky sweetness and helps thicken the mixture. Be sure to scrape the can to get every last drop of that caramel-like goodness!
- Cool Whip – The secret to a light and airy finish. Let it thaw slightly before using to make blending easier and smoother.
That’s it! Simple ingredients, big flavor, and a dessert that comes together in no time. Now, let’s get mixing!

Jesseca’s Recipe Review
This copycat recipe is dangerously easy to make—and tastes just like the real deal. Creamy, chocolatey, and icy cold, it’s one of those copycat recipes that actually lives up to the hype. We whip this up any time a drive-thru craving hits, and it’s a total win every time.
Tip from Jesseca:
For that classic thick-but-sippable texture, use super cold ingredients and don’t skip the whisking if you’re skipping the ice cream maker—it makes all the difference!
Variations and Substitutions
Want to switch things up? Whether you’re out of an ingredient or just looking to put a personal spin on this recipe, here are some easy swaps and fun variations to try:
- Milk Alternatives – No chocolate milk? No problem! Mix regular milk with cocoa powder and a touch of sugar.
- Swap the Flavor – Get a little crazy and switch the chocolate milk for strawberry milk.
- Homemade Whipped Cream – No Cool Whip? Whip up heavy cream with a little powdered sugar for a homemade alternative that’s just as fluffy.
No matter how you tweak it, this recipe stays easy, creamy, and delicious!
If you’re craving your favorite restaurant dishes at home, be sure to check out my collection of copycat recipes for even more delicious recipe inspiration.

How to Make a Homemade Frosty – Two Easy Methods
Ready to whip up a creamy, chocolatey homemade Frosty? You’ve got two foolproof options: using an ice cream maker for effortless churning or the freeze-and-whisk method for a no-special-equipment alternative. Here’s how to do both:
Ice Cream Maker Method (Recommended!)
This method gives you the smoothest, most authentic texture with minimal effort.
- Add all ingredients to a blender and blend until smooth.
- Pour the mixture into your prepared ice cream maker and follow the manufacturer’s instructions.
- Check frequently for consistency—ours reached that classic Frosty texture in about 20 minutes.
- Serve immediately and enjoy!
No Ice Cream Maker? No Problem!
Try this freeze-and-whisk method for a simple, hands-on approach.
- Blend all ingredients until smooth.
- Pour the mixture into an airtight container and place it in the freezer.
- Every 20 minutes, give it a good whisk (or stir with a fork) to break up ice crystals. Repeat for 1 to 2 hours until it reaches the perfect Frosty consistency.
- Scoop and enjoy!
Whichever method you choose, you’re just a few steps away from a creamy, chocolatey treat that tastes just like the real thing!
Storage and Make-Ahead Instructions
Want to prep your homemade Frosty in advance? Good news—it stores well and stays deliciously creamy with the right technique! Here’s how to keep it fresh:
Make-Ahead Instructions:
- Blend your ingredients and store the mixture in an airtight container in the fridge for up to 24 hours before freezing. When you’re ready, just churn it in your ice cream maker or use the freeze-and-whisk method.
How to Store Leftovers:
- Freezer Storage: Transfer any leftovers to an airtight container and freeze for up to 1 month.
- Best Texture Tip: Since homemade Frosties don’t have preservatives, they firm up in the freezer. Let it sit at room temperature for 10-15 minutes before scooping to soften it back to that classic, creamy consistency.
With these simple tips, you can always have a homemade Frosty ready to enjoy!
Recipe FAQs
Yes! You can use the freeze-and-whisk method, where you stir the mixture every 20 minutes until it reaches a Frosty-like consistency. It takes a little extra effort but still turns out creamy and delicious.
If it’s too thick, let it sit at room temperature for a few minutes before scooping. If it’s too runny, try freezing it a bit longer or reducing the blending time to prevent it from becoming too aerated.
It’s best enjoyed right away for that soft-serve texture, but you can store leftovers in an airtight container for up to 1 month. Just let it thaw for 10-15 minutes before serving.
Yes! Try mixing in mini chocolate chips, crushed cookies, or a drizzle of caramel for extra flavor. You can also top it with whipped cream or sprinkles for a fun twist!
Using an ice cream maker gives you the closest match to the original. If using the freeze method, whisk vigorously every 20 minutes to keep it light and smooth.
Want to save this recipe?
Enter your email below & we’ll send it to your inbox. Plus get great new recipes from us every week!
Copycat Wendy’s Frosty Recipe
Ingredients
- 4 cups chocolate milk (very cold)
- 3/4 cup sweetened condensed milk (about half a can)
- 4 oz frozen Cool Whip (about half the container)
Instructions
For an Ice Cream Maker:
- Combine the ingredients into a blender. Pulse until smooth.
- Pour into a prepared ice cream maker and follow the manufacture’s instructions for freezing, checking frequently for your desired consistency.
- Ours took roughly 20 minutes to get to frosty texture.
- Serve!
Freeze and Mix Version:
- Combine the ingredients into a blender. Pulse until smooth.
- Pour the mixture into an airtight container and place into the freezer.
- Whisk every 20 minutes for one to two hours, or until you reach the perfect frosty consistency.
Notes
- My son will fill a mason jar 1/2 full with the batter. From there he will take the jar out of the freezer every 20 minutes and give it a good shake. After 1 hour he swears it reaches perfect consistency.
- You can make the “batter” in advance and have it ready to go whenever you are. We keep it stored in a sealed container, unfrozen, for up to one week.
- Alternatively, you could make and freeze a large batch and keep it stored for up to 3 weeks.
- No need to buy chocolate milk to make this wendy’s milkshake. You can easily substitute regular milk with a few spoonfuls of Nesquick or Hershey’s syrup.
- Want a large batch? Double the ingredients and you’ll have enough for 16 servings!
Nutrition
The nutrition facts provided are calculated using a third-party tool and are estimates only. Actual nutritional content may vary based on the ingredients and brands you use, as well as portion sizes. For accurate results, please consult a registered dietitian or nutritionist.


my granddaughter loves the vanilla frosty, what would I need to put in the recipe, besides the regular ingredients? thanks!!
Vanilla is such a classic! This recipe is my chocolate take on the Frosty, so I don’t have a vanilla version. I’ll have to test one next time though!
It’s great using coffee syrup! 👍🥰
Oh, YUM! As a fellow coffee lover, I am sure I’ll love that swap!
I made this yesterday evening and it was amazing. better than Wendy’s. kids loved it. it took 30mins in my ice cream maker.
I’m so glad this recipe worked out for you! It is one of our favorites.
I don’t have a blender, can I use a food processor or a mixer?
I do have an ice cream maker.
A food processor or mixer will work great.
This recipe is great! My mother-in-law loves the Wendy’s frosty – and she loves this even more! I made more than I intended as I did the x2 recipe. I thought it referred to servings. Oh, well. Great recipe and thanks for posting it. I’m going to try a strawberry frosty next using strawberry milk.
Hi Bud, I’m so glad to hear this was a hit with your family. I love the idea of creating a strawberry version! Let us know how it turns out!
We did it in Mason Jars since no ice cream maker. 1 hour 20 min, shaking every 20 minutes…. I also had my freezer on Quick Freeze. Came out perfect!
Thanks for commenting, Victoria! I’m glad you loved it.
It worked great for me! It took approximately 40 min in my ice cream maker to hit the right consistency. Yum!
This didn’t work for us. We tried the shake the mason jar method. Still liquify after 2 hours. Left overnight (because we had to go to bed), and after somewhat thawing the next day we stirred. It tasted chocolaty but more like the milk. Had ice crystals. Waited longer and then it was back to liquid. Did we miss something? Does it have to be whole milk?
Hi Judy, Here are a few tips. Put the chocolate milk in the freezer for 20-30 minutes before starting so it is very cold. Try whisking instead of shaking. Shaking does give it a slightly more sorbet texture vs ice cream. You don’t have to use whole milk, so I’m still not sure why it kept going back to liquid. I’ll give it another try this week and get back to you.
A few things that could be affecting your freeze: You freezer isn’t as cold as it needs to be, There is more salt/sodium in one or more of the ingredients, (Salt lowers the freezing temperature needing a colder freezer so the more sale that goes in the colder your freezer needs to be) and finally one or more of the ingredients was not good and was causing the final product to “Break” or stay liquid/return to liquid.